 Save
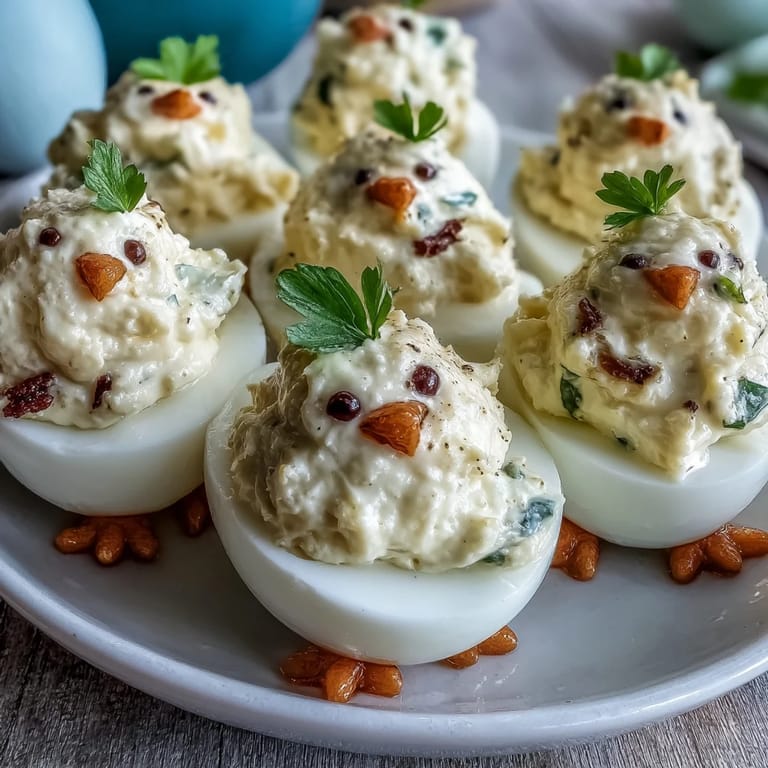
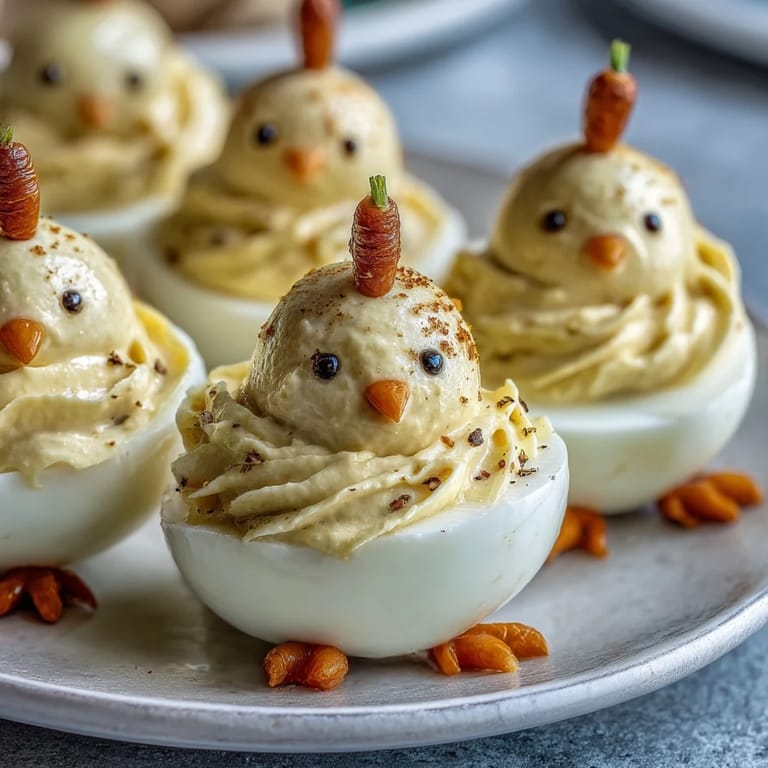
Save My daughter was convinced that deviled eggs were boring until the year I made them look like baby chicks for Easter. Watching her face light up when she realized the little peppercorn eyes were actually looking at her—that was the moment I understood that food isn't just about taste, it's about joy. These adorable little egg chicks have become our annual tradition, something the kids actually beg for instead of hide in the kitchen. What started as a silly decoration hack turned into the most requested appetizer at our table.
I'll never forget my friend Sarah's husband skeptically reaching for one at a potluck, then immediately going back for three more. He kept saying, "I don't even like deviled eggs," while eating them straight from the platter. That's when I realized these little chicks had some kind of magic—they disarm people's expectations and make them actually enjoy something they thought they didn't like.
Ingredients
- 12 large eggs: Room temperature or cold doesn't matter much, but cold eggs peel easier, which I learned the hard way after my first boiling attempt.
- 3 tablespoons mayonnaise: This is your creamy base—use a good quality mayo because it's literally the star of the filling.
- 1 teaspoon yellow mustard: Just enough to add a subtle tang without shouting; trust me, you don't want overpowering mustard here.
- 1 teaspoon white vinegar: This brightens everything and prevents the filling from tasting flat.
- ¼ teaspoon salt and ⅛ teaspoon ground black pepper: Season to your taste—I often add a tiny pinch more pepper because I like the complexity.
- 24 whole black peppercorns: These become the eyes and honestly, they're perfect because they stay put and look intentionally beady.
- 1 medium carrot: Raw carrot slices are easier to cut into tiny triangles for beaks and thin slivers for feet than you'd think.
- Fresh chives or parsley (optional): A little green garnish makes them look even more alive and adds a fresh flavor note.
Tired of Takeout? 🥡
Get 10 meals you can make faster than delivery arrives. Seriously.
One email. No spam. Unsubscribe anytime.
Instructions
- Boil the eggs gently:
- Place your eggs in a single layer in a saucepan, cover with cold water, and bring to a boil. The moment it hits a rolling boil, cover the pan and remove it from heat—the residual heat finishes cooking them perfectly. Let them sit for exactly 10 minutes, and you'll get that gorgeous creamy yolk without that gray-green ring.
- Ice bath is non-negotiable:
- Shock those hot eggs immediately into ice water and let them chill for about 5 minutes. This stops the cooking process and makes peeling infinitely easier; I learned this after peeling warm eggs and nearly throwing my paring knife across the kitchen.
- Peel with patience:
- Gently tap and roll each egg to crack the shell all over, then peel under cool running water if needed. The shells practically fall away when you do this right, revealing smooth, perfect egg whites.
- Prepare the egg bodies:
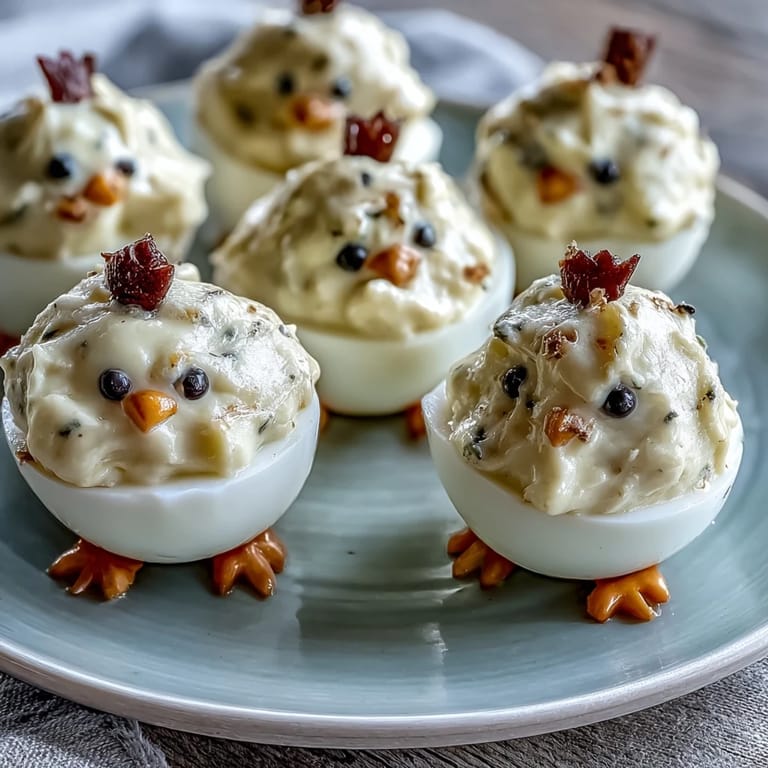
- Slice a thin sliver off the bottom of each egg white so it sits flat and stable on your serving tray. Then carefully slice off the top third of each egg horizontally—this creates the "hatching" effect and gives you that perfect cap.
- Create the filling:
- Pop all your yolks into a bowl and mash them with the mayo, mustard, vinegar, salt, and pepper until you get a smooth, creamy consistency. Don't overthink it—a fork does the job beautifully and keeps the texture rustic and delicious.
- Fill and mound:
- Using a spoon or piping bag, fill the bottom egg white halves with the yolk mixture, mounding it up slightly to create the chick's "head." I use a small spoon because it gives me more control over the shape.
- Set the caps at an angle:
- Place each egg white cap back on at a jaunty, slightly tilted angle—this is what makes them look like they're hatching. It's the small tilted detail that transforms them from regular deviled eggs into little characters.
- Add the carrot features:
- Cut tiny triangles from your carrot for beaks and thin little slivers for feet, then gently press them into the yolk mixture. The carrot sticks to the mayo filling, which holds everything in place surprisingly well.
- Eyes bring them to life:
- Press two black peppercorns into the top of each chick as eyes. Suddenly they have personality—each one looks slightly different depending on the angle, which is exactly the point.
- Finishing touch:
- If you want, scatter a little fresh chives or parsley around the platter for garnish. It adds a fresh flavor note and makes the whole presentation look intentional and elegant.
 Save
Save There's something deeply satisfying about watching someone's serious expression transform into a grin when they realize these little eggs have feet. My six-year-old nephew actually sat down and counted all the peppercorn eyes, making sure every chick could "see" properly. That's when food stops being just nutrition and becomes memory.
Smart Filling Variations
The classic mayo-mustard base is perfect, but I've played around with it enough to know what works. Greek yogurt swapped for mayo gives you a lighter, tangier filling that's honestly just as creamy. I once added a tiny pinch of smoked paprika, and suddenly everyone was asking what my secret ingredient was. Finely chopped fresh dill or tarragon brings an herbaceous elegance that makes people think you fussed way more than you actually did.
Make-Ahead Magic
These are genuinely better when you make them the night before because the flavors meld and deepen. I keep mine covered loosely with plastic wrap in the fridge, and they stay perfect for up to a day. The one thing I always do is wait until serving time to add the parsley garnish, because it stays fresher and more vibrant that way.
The Carrot Decoration Secret
Carrot is honestly the MVP ingredient here because it's sturdy enough to hold its shape but soft enough to cut into delicate little shapes. I keep a small sharp paring knife specifically for this because regular knives are too chunky. The trick I learned through trial and error is to cut your pieces slightly larger than you think you need—they always look smaller once you press them into the filling.
- Cut carrot pieces on a slight angle so they resemble actual beaks and feet rather than random vegetable chunks.
- If you can't find small-enough carrot slivers, try using sweet red pepper instead for a prettier presentation.
- Keep your carved pieces on a damp paper towel so they don't dry out while you're assembling the other chicks.
 Save
Save These little egg chicks have a way of turning ordinary gatherings into moments people actually remember. Serve them chilled and watch what happens—I promise you'll see that same magical look on someone's face that my daughter had on that first Easter.
Recipe FAQs
- → How do I boil eggs perfectly for this dish?
Place eggs in a single layer in cold water, bring to a boil, then cover and remove from heat. Let stand 10 minutes before cooling in ice water.
- → What can I use instead of mayonnaise for the filling?
Greek yogurt is a great alternative for a lighter and tangier filling without sacrificing creaminess.
- → How do I create the chick decorations?
Use small carrot triangles for beaks and feet, and whole black peppercorns for eyes to give each egg a chick-like appearance.
- → Can these be prepared ahead of time?
Yes, you can make them up to one day in advance and keep them refrigerated, covered until ready to serve.
- → Are there any common allergens in these deviled egg chicks?
They contain eggs and mayonnaise, which may also include mustard; check ingredient labels if allergens are a concern.