 Save
Save I still remember the first time I encountered a proper pickled vegetable spread at a farmer's market in late summer. A vendor had arranged these jewel-toned vegetables in glass jars with such care that I couldn't resist buying three different varieties. That afternoon, I sat on my kitchen counter with crusty bread and a wedge of cheese, discovering that these simple pickled vegetables could transform an ordinary snack into something almost magical. Years later, I've learned that making your own pickled and fermented feast is even better than buying them—you control every flavor note, every crunch, every moment of tang.
I made this feast for a dinner party once when I was nervous about cooking an elaborate main course. Instead, I filled a wooden board with these colorful jars and served them with good bread and cheese, letting guests graze while we talked. The evening felt luxurious and relaxed in a way that fussy cooking never achieves. My friend Sarah still mentions that night as one of her favorite meals we've shared.
Ingredients
- Fresh Vegetables—carrots, cucumber, radishes, red cabbage, cauliflower, and green beans: Choose vegetables that are crisp and fresh, and cut them uniformly so they pickle at the same rate. I learned this the hard way when some pieces stayed crunchy while others turned mushy. Cut the carrots and cucumbers into long matchsticks, slice radishes paper-thin on a mandoline if you have one, and keep the cauliflower florets small and bite-sized.
- White Vinegar and Water: This ratio creates a brine that's sharp but not overwhelming. If you want something gentler, use half rice vinegar instead.
- Sugar and Kosher Salt: These balance the vinegar's bite and help preserve everything beautifully. The salt especially matters—use kosher salt, not iodized table salt, which can cloud your brine.
- Garlic, Mustard Seeds, Coriander Seeds, Black Peppercorns, Bay Leaves, and Fresh Dill: These aromatics are what separate homemade pickles from bland grocery store versions. The mustard seeds add a gentle heat, the coriander brings warmth, and the dill is essential for that classic pickle flavor. Don't skip the garlic.
- Fresh Red Chili: Optional, but it adds both heat and visual appeal if you slice it thinly and let it float in the brine.
- Kimchi and Sauerkraut: These are the fermented components that add complexity. Use store-bought if you're short on time, or make your own if you're feeling ambitious.
Tired of Takeout? 🥡
Get 10 meals you can make faster than delivery arrives. Seriously.
One email. No spam. Unsubscribe anytime.
Instructions
- Wash and Prep Your Vegetables:
- Rinse everything under cold water and pat completely dry. This matters more than you'd think—excess water dilutes your brine. Cut your carrots and cucumbers into long, elegant matchsticks about the size of your pinky finger. Slice the radishes as thin as you can manage. Shred the cabbage into ribbons. Keep the cauliflower florets small, and trim the green beans to fit nicely in your jars.
- Build Your Brine:
- Pour the vinegar and water into a saucepan and set it over medium-high heat. Watch as it begins to steam, then add the sugar and salt. Stir gently until everything dissolves completely—you shouldn't see any grains of salt left. This takes just a few minutes. The brine should smell sharp and inviting, almost like the air at a pickle factory.
- Arrange with Intention:
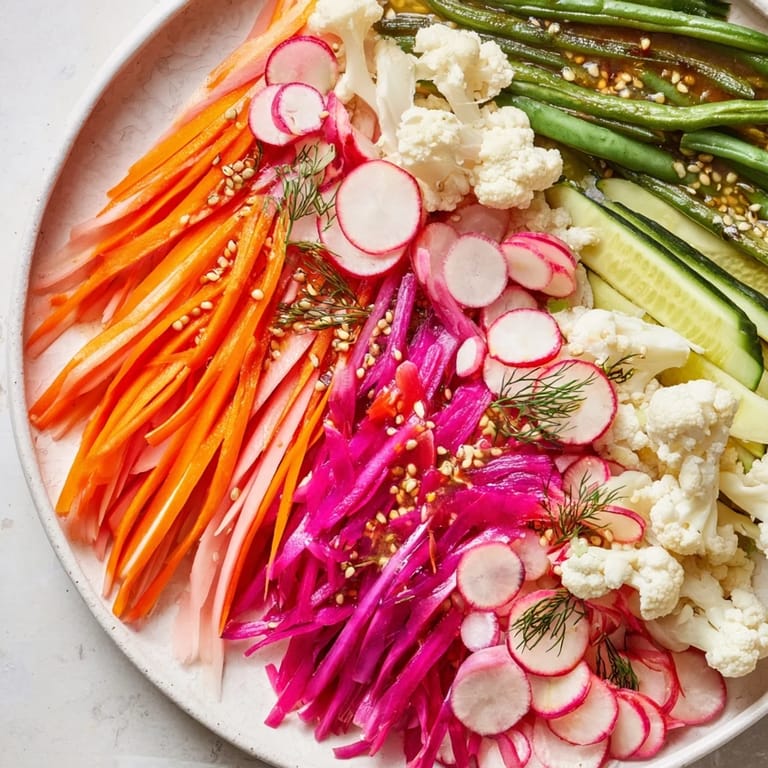
- Find clean glass jars with tight-fitting lids—mason jars work beautifully. Start packing vegetables in, keeping colors separated and grouped. I always put the bright orange carrots in one section, the deep red radishes in another, the pale cauliflower in a third. This isn't just for looks; it also helps you see how much of each vegetable you have. Pack them snugly but not crushed.
- Layer In Your Aromatics:
- Divide the garlic slices, mustard seeds, coriander seeds, peppercorns, bay leaves, and dill sprigs among your jars, nestling them in and around the vegetables. If you're using the chili, slice it thinly and add it now. These spices will perfume everything as they sit.
- Pour and Submerge:
- Carefully pour the warm brine over everything, making sure every vegetable is completely covered. This is important—any vegetable poking above the brine will spoil. If needed, tuck a small piece of cabbage or dill on top to keep things submerged as they cool.
- Cool and Refrigerate:
- Let the jars sit at room temperature for a few hours as the brine cools to body temperature. This allows the flavors to start melding. Once cool, seal the jars tightly and move them to the refrigerator. For quick pickles with a bright, fresh taste, wait 12 hours. For deeper, more complex flavor, wait the full 48 hours.
- Ferment Intentionally (If You're Feeling It):
- If you want true fermented vegetables instead of quick pickles, prepare a separate brine with just salt and water—2 percent salt by weight, which means 20 grams of salt per liter of water. Pack your vegetables in a clean jar, pour the brine over them, and keep them at room temperature where you'll see them every day. They'll start to bubble and become increasingly tangy over 5 to 7 days. Taste daily and move them to the fridge when they're perfect to your taste.
- Present Your Masterpiece:
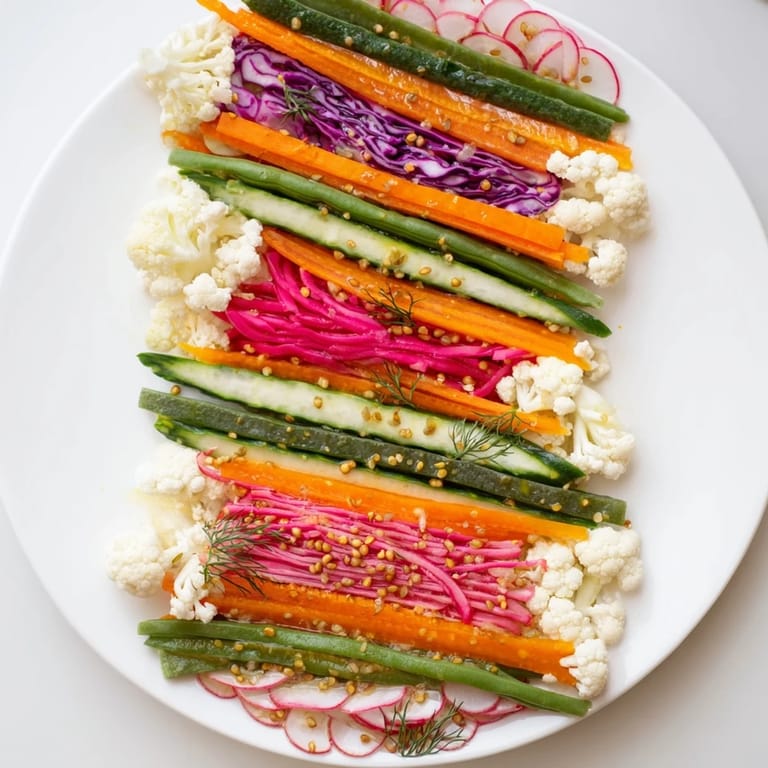
- Arrange the pickled vegetables in small jars or shallow bowls on a beautiful wooden board. You can line them up in neat rows, create a geometric grid, or scatter them artfully. The colors should shine against the board.
- Always use a clean fork or spoon when removing vegetables from the jar, never your fingers, to prevent contamination and keep them lasting longer
- If you accidentally leave a jar at room temperature instead of refrigerating it, move it to the fridge immediately—don't taste it first if it's been out more than a few hours
- The brine that remains after you've eaten the vegetables is liquid gold for salad dressings and can be poured over grain bowls or used to pickle the next batch
- → What vegetables work best for pickling and fermenting?
Crunchy vegetables such as carrots, cucumbers, radishes, red cabbage, cauliflower, and green beans hold texture well and absorb brine flavors beautifully.
- → How long should the pickling process take?
Quick pickling requires at least 12 hours in the refrigerator, while fermentation takes 5–7 days at room temperature for deeper flavors.
- → Can I customize the spices used in the brine?
Yes, spices like mustard seeds, coriander, black peppercorns, garlic, dill, and bay leaves can be adjusted or supplemented to suit personal taste.
- → How should the vegetables be arranged for serving?
Arrange pickled and fermented vegetables in small jars or bowls, then organize them in linear or grid patterns on a serving tray for a visually appealing presentation.
- → Are there any dietary considerations to keep in mind?
This dish is vegan, gluten-free, and free from common allergens, but verify any store-bought fermented products for hidden ingredients.
- → What pairings complement this vegetable spread?
Pair with crusty bread, cured meats, vegan cheeses, or enjoy alongside a crisp Riesling or dry rosé for a complete tasting experience.
 Save
Save There's something profound about serving food that you've made with your own hands, knowing that patience did most of the work. When my young niece tried these pickles for the first time, she pointed at the vibrant colors and asked if I'd painted them. That simple question reminded me why I love making food—it becomes a little piece of care that you're offering to the people you love.
Flavor Variations to Explore
Once you master the basic technique, the possibilities expand beautifully. Try apple cider vinegar mixed with white vinegar for a softer, sweeter tang that works especially well with beets and turnips. Rice vinegar creates a gentler brine that's wonderful for delicate vegetables like green beans and sliced radishes. I've also experimented with adding fresh turmeric root, a few cloves, or a star anise to the brine, which transforms it into something with more exotic warmth. The joy of making your own pickles is that you control every element—start with the classic version, then trust your instincts to experiment.
Building the Perfect Serving Board
Presentation matters more than you might think when it comes to pickled vegetables. The colors are your greatest asset, so arrange them thoughtfully. Use a wooden board if you have one, but even a simple white plate works beautifully. Line your jars or small bowls up in straight rows for a modern feel, or create a circular pattern for something more casual. Surround your pickled vegetables with good crusty bread, a selection of cheeses, some cured meats or vegan alternatives, and maybe a spread of hummus or white bean dip. This becomes an entire meal that feels special without requiring much cooking.
Keeping and Using Your Pickles
One of the best parts about making pickled vegetables is that they improve with time and require almost no maintenance. Sealed jars keep beautifully in the refrigerator for up to three months, though they rarely last that long in my kitchen. The vegetables themselves will continue to soften slightly as they sit, so eat the crunchier varieties first if you prefer maximum texture. Beyond serving them as an appetizer, I've learned to use pickled vegetables in other ways: toss them into green salads for brightness, add them to grain bowls for tang and crunch, layer them into sandwiches, or eat them straight from the jar as a snack with a fork while cooking dinner. They're endlessly versatile.
 Save
Save Making these pickles taught me that some of the most impressive food we can offer requires patience rather than skill. There's real magic in watching plain vegetables transform into something vibrant and flavorful over the course of a day or two.