 Save
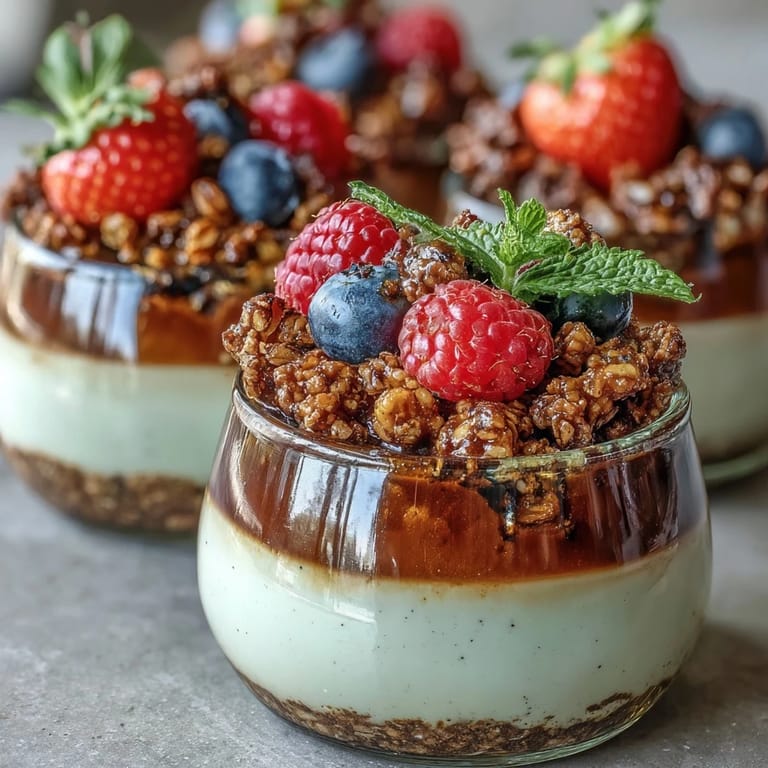
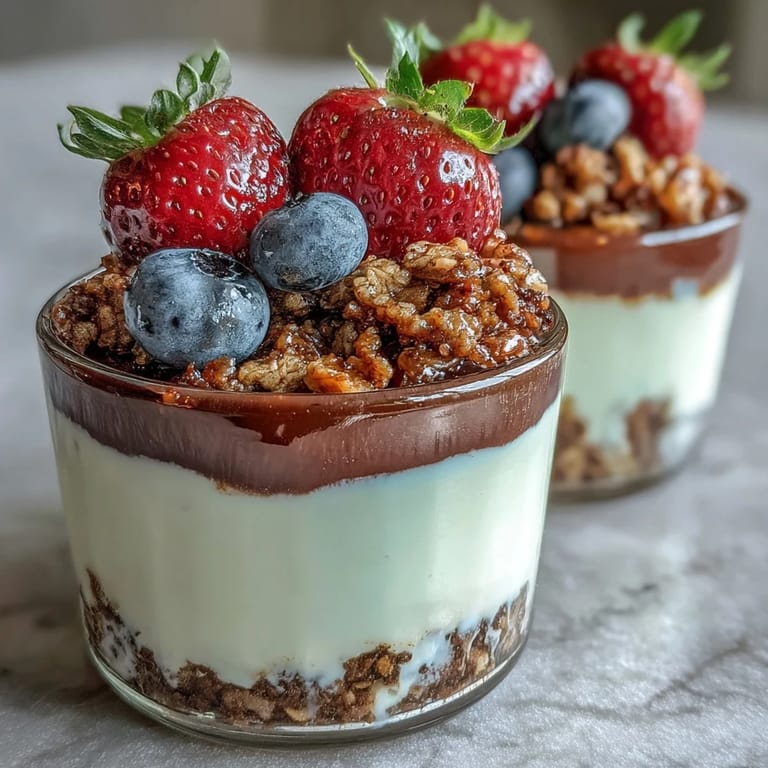
Save There's something almost meditative about watching hojicha steep into cream, the way the roasted tea transforms something already luxurious into something quietly sophisticated. I stumbled onto this combination late one afternoon while reorganizing my tea drawer, holding a tin of hojicha and suddenly imagining it suspended in something cool and silky. The result was this parfait, a dessert that feels like a composed moment in a glass, each layer announcing itself with its own texture and warmth.
I made this for my neighbor during one of those late-summer evenings when everyone's tired of heavy desserts, and watching her face when she tasted it, the way she paused and said "wait, what is that?" completely made my day. There's real satisfaction in serving something elegant that also happens to be straightforward, especially when someone's genuinely surprised by the flavors.
Ingredients
- Heavy cream: The foundation of everything creamy here, and I've learned that full-fat is non-negotiable if you want that luxurious mouthfeel that makes this feel special.
- Whole milk: Balances the richness without diluting the hojicha flavor, creating a texture that's silky rather than heavy.
- Hojicha tea leaves: Roasted green tea with a toasty, almost coffee-like depth that transforms panna cotta from ordinary to memorable, and it's worth seeking out loose leaf if you can.
- Granulated sugar: Dissolved into the warm cream to sweeten without graininess, and I tend to err toward the lighter end since the berries add natural sweetness.
- Powdered gelatin: The structural hero that gives you that wobble without being rubbery, and blooming it separately ensures no lumps.
- Cold water: For blooming the gelatin properly, which is one of those small steps that makes all the difference.
- Vanilla extract: A whisper of vanilla that lets the hojicha shine rather than competing with it.
- Mixed fresh berries: Whatever looks brightest at the market, since they provide tartness and visual contrast that the dessert genuinely needs.
- Granola: I've used both homemade and store-bought, and either works, but the crunch is essential for keeping things interesting texture-wise.
Tired of Takeout? 🥡
Get 10 meals you can make faster than delivery arrives. Seriously.
One email. No spam. Unsubscribe anytime.
Instructions
- Bloom your gelatin:
- Sprinkle the powdered gelatin over cold water in a small bowl and let it sit for about 5 minutes until it looks like wet sand. This step prevents lumps from forming when you mix it into the warm cream later.
- Heat the cream and milk:
- Combine them in a saucepan and warm gently over medium heat until you see small bubbles forming at the edges, but don't let it boil. You're looking for that moment just before it would boil, which takes maybe 5 minutes.
- Steep the hojicha:
- Add the hojicha leaves to the hot cream mixture, cover the saucepan, and let it sit for 10 minutes so the tea fully infuses. The kitchen will smell incredible, with that toasty, almost caramelized scent filling everything.
- Strain and return:
- Pour the mixture through a fine mesh sieve into a bowl, pressing gently on the leaves to extract every bit of flavor, then return it to the saucepan. This step removes any stray leaf fragments and gives you a silky texture.
- Dissolve the sugar:
- Add the sugar to the hojicha-infused cream and stir over medium heat until the sugar completely dissolves, which should take just a minute or two. Don't let it boil again at this point.
- Combine gelatin and vanilla:
- Remove from heat, add the bloomed gelatin, and stir until it's completely dissolved and smooth, then add the vanilla extract. The residual heat will melt the gelatin completely without you needing to do anything special.
- Pour into glasses:
- Divide the mixture among 4 serving glasses, filling each just under halfway, then refrigerate for at least 4 hours until completely set. I usually do this step in the morning so everything's ready by evening.
- Macerate the berries:
- While the panna cotta chills, toss your berries with a tablespoon of sugar if you like and let them sit in the refrigerator for about 10 minutes so they release their juices. This isn't strictly necessary but adds a syrupy sweetness that ties everything together.
- Layer and serve:
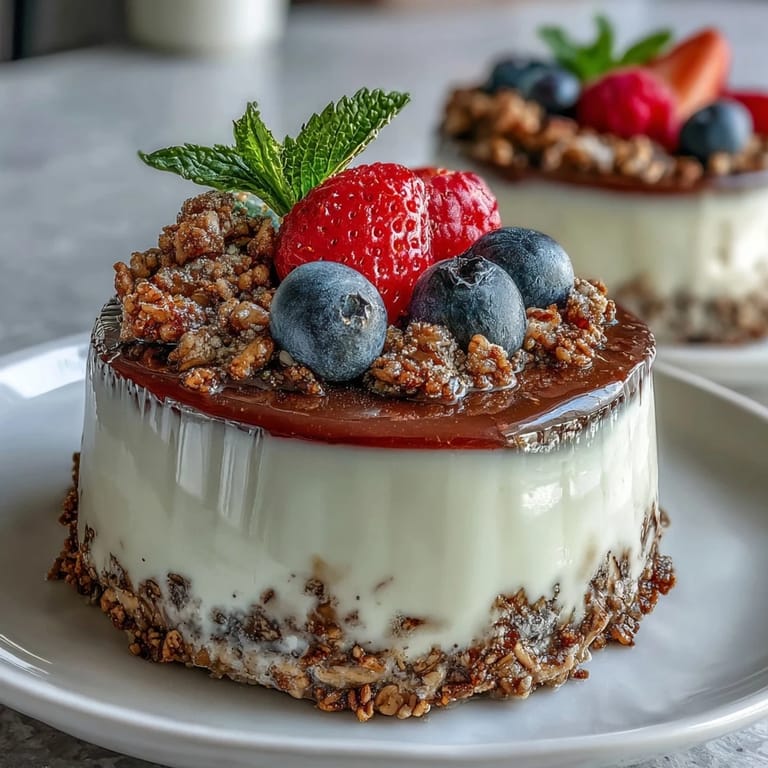
- Once the panna cotta is completely set, spoon a layer of granola over each one, then top with the berries and their juice. You can repeat the layers if you want taller parfaits, but I find one layer of each keeps things elegant and balanced.
 Save
Save This dessert became my go-to for dates and casual dinner parties not because it's complicated, but because it feels thoughtful without demanding hours in the kitchen. There's something about serving something delicious that also showcases intentional flavors that makes people feel genuinely cared for.
What Makes Hojicha Special
Hojicha is roasted green tea, which means it's been processed at a higher heat than regular green tea, creating this warm, almost coffee-adjacent flavor that's deeply satisfying without being bitter. It's become one of my favorite secret weapons for desserts because it adds sophistication without requiring people to identify exactly what they're tasting, and it pairs beautifully with cream because the nuttiness complements richness rather than competing with it. If you can't find hojicha, matcha makes a lovely alternative, though the flavor will be brighter and more grassy instead of toasty.
Making It Your Own
The beauty of this format is that you can swap the berries based on the season or whatever looks good at the market, and the hojicha will work beautifully with strawberries, raspberries, blackberries, or even stone fruits if you want to get creative. I've also played with the granola component, sometimes using a brown sugar granola for extra depth, and once even trying a honey-roasted version that was unexpectedly perfect. The core panna cotta stays the same, but the toppings give you room to experiment.
Storage and Make-Ahead Tips
You can prepare the panna cotta layer up to 2 days ahead and keep it covered in the refrigerator, which means you're only adding the berries and granola right before serving. This makes it perfect for entertaining because you can have one major component ready and just do the final assembly when people are about to eat.
- Make the panna cotta the day before if you're cooking for guests, so you're not stressed about timing.
- Keep the granola in an airtight container separate until the very last moment before serving to maintain its crunch.
- If berries start releasing too much juice, drain some off before layering so the panna cotta doesn't get watery.
 Save
Save This parfait has become one of those recipes I return to again and again because it feels elegant but isn't precious, and it genuinely tastes like you spent more time on it than you actually did. That's the best kind of dessert to have in your rotation.
Recipe FAQs
- → What does hojicha taste like?
Hojicha offers a distinctive roasted, nutty flavor with subtle caramel notes and lower caffeine than other green teas. The roasting process creates a warm, toasty profile that's less grassy than matcha or sencha, making it perfect for desserts where you want depth without bitterness.
- → Can I make this dessert ahead of time?
The panna cotta layer can be prepared up to 2 days in advance and kept refrigerated. However, assemble with granola and berries just before serving to maintain the satisfying crunch and prevent granola from becoming soggy. The berries can be macerated a few hours ahead and kept chilled.
- → What can I substitute for gelatin?
For a vegetarian version, agar-agar works well—use 1 teaspoon powdered agar-agar per cup of liquid. Note that the resulting texture will be slightly firmer and more brittle than traditional gelatin. Leaf gelatin can be substituted in equal blooming weight if you prefer.
- → How do I achieve the smoothest panna cotta texture?
Strain the infused cream through a fine-mesh sieve to remove any tea leaf particles or gelatin clumps. Avoid boiling the mixture after adding gelatin, as excessive heat can break down the setting agent. Pour gently into glasses to minimize bubbles, and tap gently on the counter to release air pockets.
- → Can I use different fruits or toppings?
Absolutely. Poached pears, caramelized figs, or stone fruits complement the roasted tea flavors beautifully. For crunch alternatives, consider toasted nuts, sesame brittle, or even a layer of hojicha-infused sponge cake. Seasonal berries work best, but frozen can be used when fresh aren't available.
- → Why is my panna cotta not setting properly?
This usually happens if gelatin wasn't fully bloomed or the mixture was boiled after adding gelatin, which weakens its setting power. Ensure gelatin is fully dissolved but not overheated, and give adequate chilling time—至少4 hours or overnight for firmest results.