 Save
Save The first time I made this was on a whim after tasting honey dripping off a spoon at a farmer's market. I became obsessed with the idea of building an entire dessert around that single moment of golden sweetness. That afternoon in my kitchen, I realized I wanted to create something that would let guests experience that same magic, but layered with cake and cream. The Honey-Drip was born from that daydream, and now it's the dessert that makes people lean in close and smile the second they see it arrive at the table.
I made this for my sister's engagement party last spring, and I'll never forget how quiet the room went when I set it on the table. People pulled out their phones, sure, but then they tasted it and the phones disappeared. That's when I knew this recipe had something special, something that bridges the gap between beautiful and delicious in a way that doesn't happen often.
Ingredients
- All-purpose flour: You want a standard blend here, nothing too heavy; this is about structure, not density.
- Baking powder and baking soda: This combo is crucial for the tender crumb that lets the honey shine through without being chewy.
- Unsalted butter: Softened at room temperature so it creams properly and carries the honey flavor evenly.
- Honey: Use the good stuff in the batter, not the squeeze bottle; the flavor difference is immediate.
- Eggs: Large eggs beaten well trap air and give you that light, airy texture that makes the cake dissolve on your tongue.
- Vanilla extract: One teaspoon is the golden ratio; more can mask the honey.
- Whole milk: The fat content keeps everything rich without making it dense.
- Heavy cream: Whip it to peaks for the filling; don't skip this step.
- Mascarpone cheese: This adds tang and body that balances the sweetness of the honey.
- High-quality liquid honey for serving: Wildflower or acacia honey has a complexity that makes the center pot feel intentional, not just sweet.
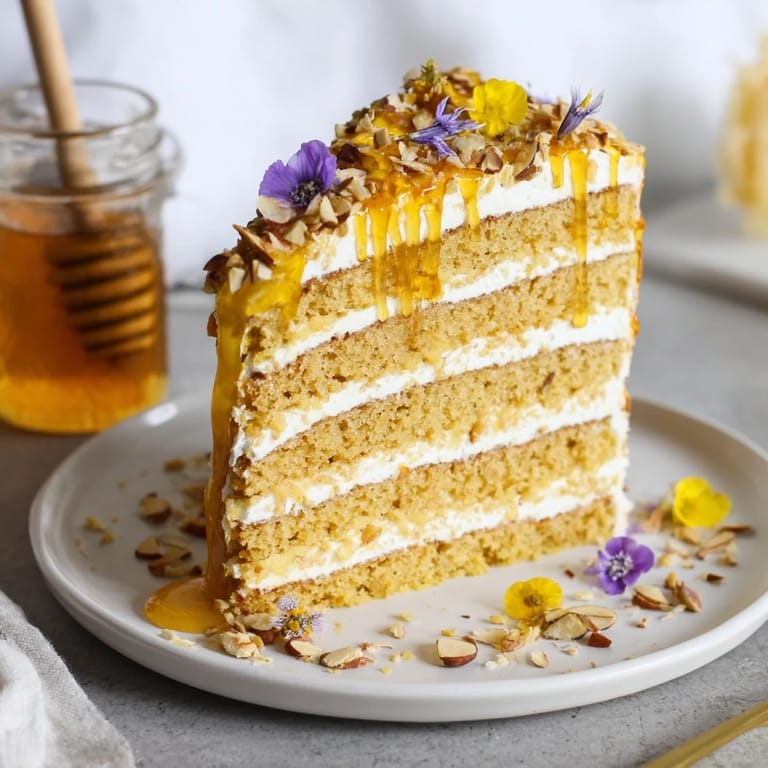
- Toasted almonds: The crunch is essential for contrast; raw almonds won't give you that same pop of texture.
Tired of Takeout? 🥡
Get 10 meals you can make faster than delivery arrives. Seriously.
One email. No spam. Unsubscribe anytime.
Instructions
- Heat your oven and prepare:
- Get to 350°F (175°C) and grease those pans well, then line the bottoms with parchment. You want the cakes to slip out cleanly and without sticking, which ruins the presentation before you even begin.
- Mix your dry ingredients:
- Whisk flour, baking powder, baking soda, and salt together in one bowl; this aerates everything and prevents lumps that would otherwise hide in your batter.
- Cream the butter and sugar:
- Beat them together until the mixture looks pale and fluffy, about 3 minutes. You should see ribbons form when you lift the beaters; this is air being incorporated into the fat, which will make your cake tender.
- Add the wet ingredients:
- Pour in the honey, then add eggs one at a time, beating well between each addition. Finish with vanilla, then scrape the bowl to make sure everything is evenly mixed.
- Alternate the dry and wet:
- Start with dry, then milk, then dry again, and finish with dry. This technique prevents overmixing, which would develop gluten and make your cake tough instead of tender.
- Bake with patience:
- Divide the batter evenly and bake for 22 to 25 minutes; the toothpick should come out with just a few moist crumbs. A minute too long and your honey cake becomes brittle.
- Cool completely before moving on:
- Hot cake layers tear and crumble, so let them rest on a wire rack until they're room temperature or even cold; overnight in the fridge is ideal.
- Whip the honey cream:
- Heavy cream goes to soft peaks first, then you fold in the honey and mascarpone and whip to stiff peaks. This filling should be thick enough to hold the layers steady.
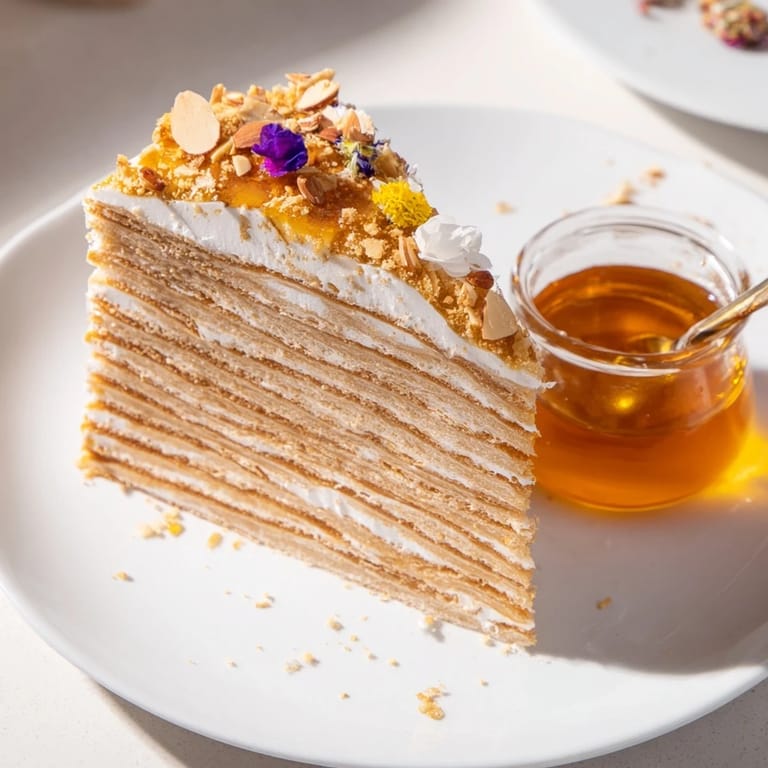
- Slice each cake into two thin layers:
- Use a serrated knife and a gentle sawing motion to split each cake horizontally; you're aiming for four layers total, each about three-quarters of an inch thick.
- Stack with intention:
- Place the first layer on your serving platter, spread with honey cream, then repeat with the remaining layers. This is where patience pays off; let each layer set slightly before adding the next.
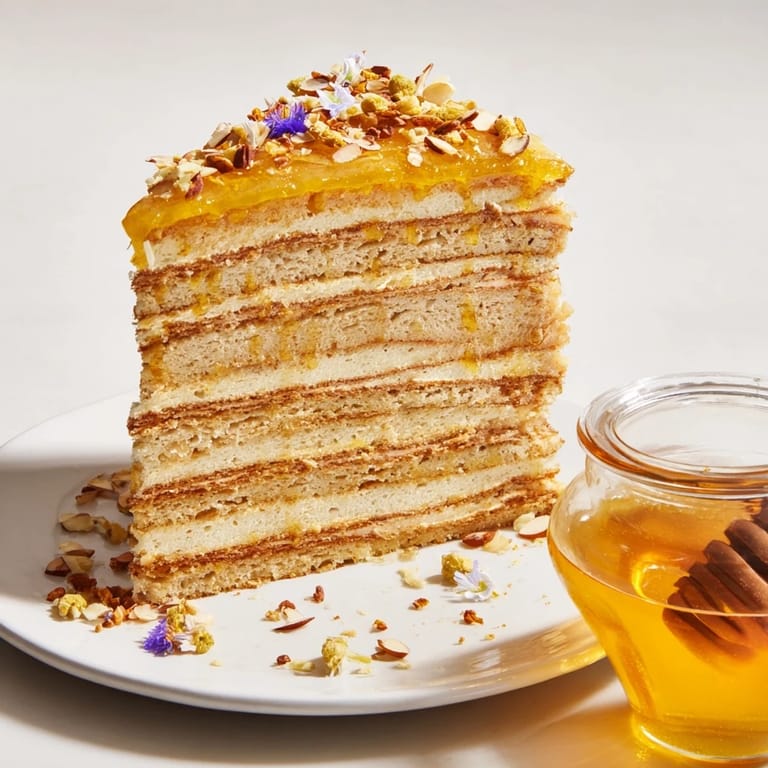
- Create the central honey pot:
- Using your 3-inch round cutter, carefully cut straight down through all four layers from the top; you should be able to lift out a core with a gentle twist. Place your honey pot in the hole and fill it with high-quality liquid honey.
- Garnish with texture and beauty:
- Top with toasted almonds, edible flowers if you're using them, and a final drizzle of honey. This isn't just for show; it's telling people how to experience the dessert.
 Save
Save What stuck with me most was watching someone's face the moment they dipped a forkful into that warm honey at the center. It wasn't just delicious; it was a surprise every time, like discovering something you didn't know you needed. That's the magic of this dessert, really—it makes people present at the table, engaged with their food in a way that feels rare.
Why Honey Matters Here
Honey does something in a cake that sugar alone cannot: it adds moisture, depth, and a subtle complexity that makes people pause and ask what they're tasting. The flavor doesn't feel one-note or cloying the way a straight-sugar cake sometimes does. It's smooth, it's natural, and it invites you to take another bite. I learned this by accident when I ran out of regular sugar one evening and grabbed honey instead, and suddenly I understood why some desserts feel special and others feel routine.
The Art of Dipping
This dessert turns eating into a ritual, which is something I don't take for granted. The moment someone cuts into that cake and reaches for the honey pot, they're no longer passive; they're part of creating their own experience. Some people dip lightly, others completely submerge each bite, and there's something joyful about watching those preferences emerge. It's a small thing, but it changes the energy of dessert from consumption to participation.
Storage and Variations
This cake keeps beautifully wrapped in the refrigerator for up to four days, and the honey filling actually improves as flavors meld. You can make it a day ahead and garnish it just before serving, which takes pressure off your timing when guests arrive. For variations, try orange blossom or lavender honey in the central pot, or swap the almonds for pistachios if you want something different but still crunchy and refined.
- Nut-free? Simply omit the almonds and add an extra drizzle of honey on top for visual interest.
- The mascarpone can be swapped for crème fraîche if you prefer a sharper tang to balance the sweetness.
- Serve this with a glass of Moscato or late-harvest Riesling to complete the moment.
 Save
Save This dessert isn't just about taste; it's about creating a moment. Every time you make it, you're inviting people to slow down and notice what they're eating, and that's a gift worth giving.
Recipe FAQs
- → What type of honey works best for the cake?
Wildflower or acacia honey is recommended for its rich flavor and smooth texture, perfect both in the batter and as the central flowing honey.
- → Can I replace mascarpone in the filling?
You can substitute mascarpone with cream cheese for a slightly tangier but creamy filling texture.
- → How do I create the central honey pot in the cake?
After assembling the layers, use a 3-inch round cutter to make a hole in the center and place a small glass or ceramic pot filled with honey inside.
- → What is the purpose of the toasted almonds?
Toasted almonds add a crunchy texture and nutty flavor that complements the soft cake and swirling honey.
- → Any tips for slicing and serving?
Slice the cake carefully around the honey pot so each piece can be dipped into the warm honey for maximum flavor.
- → Is it possible to make this dessert nut-free?
Yes, simply omit the chopped toasted almonds to accommodate nut allergies.