 Save
Save My neighbor knocked on my door with a stack of boxes, her eyes wide with that first-day-of-moving exhaustion, and I knew exactly what she needed: not a casserole, but something that felt celebratory. That's when I realized a dessert bar—a whole spread of tiny, jewel-like treats—could turn an ordinary housewarming into something memorable. Each bite tells a different story, and somehow, assembling them all together on one platter feels like you're throwing a proper party, even if it's just for eight people in a new kitchen.
I made this spread for the first time on a rainy Sunday when my sister was visiting, and we spent the afternoon with our hands covered in chocolate, cream cheese, and pastry crumbs, laughing at how the tartlet filling kept wanting to slide everywhere. By the time we arranged everything on that tiered stand—which I borrowed from my mum, slightly sheepish about it—we both stepped back and felt genuinely proud. It wasn't just food; it was proof that we'd created something together that looked like it came from a proper bakery.
Ingredients
- Unsalted butter (125 g total): You'll use it three different ways here, and keeping it unsalted gives you control over the salt balance in each component.
- Dark chocolate, chopped (100 g): Don't use chocolate chips if you can help it; rough chopped pieces melt more evenly and give you that silky batter texture.
- Granulated sugar (130 g total across all three recipes): This is your workhorse sweetener; measure it carefully because slightly less creates fudgier brownies, slightly more makes the cheesecake richer.
- Large eggs (4 total): Room temperature eggs blend more smoothly, so pull them out of the fridge about twenty minutes before you start.
- Vanilla extract (2 tsp total): Real vanilla makes a noticeable difference here; the cheaper imitation version can taste slightly bitter when baked.
- All-purpose flour (60 g): Don't sift it unless your recipe specifically calls for it; just spoon it gently into your measuring cup and level it off.
- Cream cheese, softened (150 g): This one matters tremendously; cold cream cheese lumps in your filling, so leave it on the counter for thirty minutes minimum.
- Lemon juice and zest (1 tbsp juice, 1 tsp zest): Microplane your zest fresh from the lemon just before mixing; the oils are what make this sing.
- Digestive biscuits or graham crackers (6, finely crushed): Crush them in a sealed bag with a rolling pin if you don't have a food processor; the texture should feel like damp sand.
- Ready-rolled shortcrust pastry (1 sheet): Cold pastry is your friend; if it warms up while you're working, pop it back in the freezer for five minutes.
- Whole milk (75 ml): This creates your pastry cream base, and full-fat milk makes it taste richer than you'd expect from such a small amount.
- Cornstarch (1 tsp): This is what stops your filling from being runny; don't skip it or try to substitute without understanding how it thickens.
- Assorted fresh berries (80 g): Whatever's in season and looks bright; tired-looking berries will drag down the whole visual presentation.
Tired of Takeout? 🥡
Get 10 meals you can make faster than delivery arrives. Seriously.
One email. No spam. Unsubscribe anytime.
Instructions
- Get your station ready:
- Preheat your oven to 180°C and grease your mini muffin tins thoroughly or line them with paper cases. Having everything prepared before you start means you're not scrambling halfway through with wet hands.
- Melt chocolate with butter:
- Use a heatproof bowl set over simmering water (not touching the water) or do it carefully in thirty-second microwave bursts, stirring between each one. The gentle heat prevents the chocolate from seizing into a grainy mess.
- Build your brownie batter:
- Whisk sugar, eggs, and vanilla into your melted chocolate mixture until it's smooth and glossy. Fold the flour and salt in with a spatula, stopping as soon as you don't see white streaks; overmixing creates tough, cakey brownies instead of fudgy ones.
- Bake the brownie bites:
- Divide batter among eight mini muffin cups and bake for twelve to fifteen minutes until the tops are set but the centers still jiggle slightly when you gently shake the tin. They'll continue cooking slightly as they cool, reaching that perfect fudgy texture.
- Prepare cheesecake crusts:
- Mix your crushed biscuits with melted butter until it resembles wet breadcrumbs, then press it firmly into the bottom of eight clean mini muffin cups. The pressure keeps it from crumbling when you add the filling.
- Make cheesecake filling:
- Beat softened cream cheese and sugar until it's completely smooth with no lumps, then gently fold in the egg, lemon juice, zest, and vanilla just until combined. Overmixing here incorporates air bubbles that crack the surface as it bakes.
- Bake cheesecake cups:
- Spoon filling over crusts and bake for twelve to fifteen minutes until the tops look just set with a tiny wobble in the center. They firm up completely as they cool and chill, so resist overbaking.
- Prepare tartlet shells:
- Cut your shortcrust pastry into eight circles using a small cutter or the rim of a glass, then press each circle into a mini tartlet tin and prick the base with a fork to prevent puffing. Bake for ten to twelve minutes until golden, then cool completely.
- Make pastry cream filling:
- Whisk milk, egg yolk, sugar, cornstarch, and vanilla in a saucepan, then place over medium heat and stir constantly until it thickens into something that coats the back of a spoon. This takes about three to four minutes and requires patience; rushing it burns the bottom.
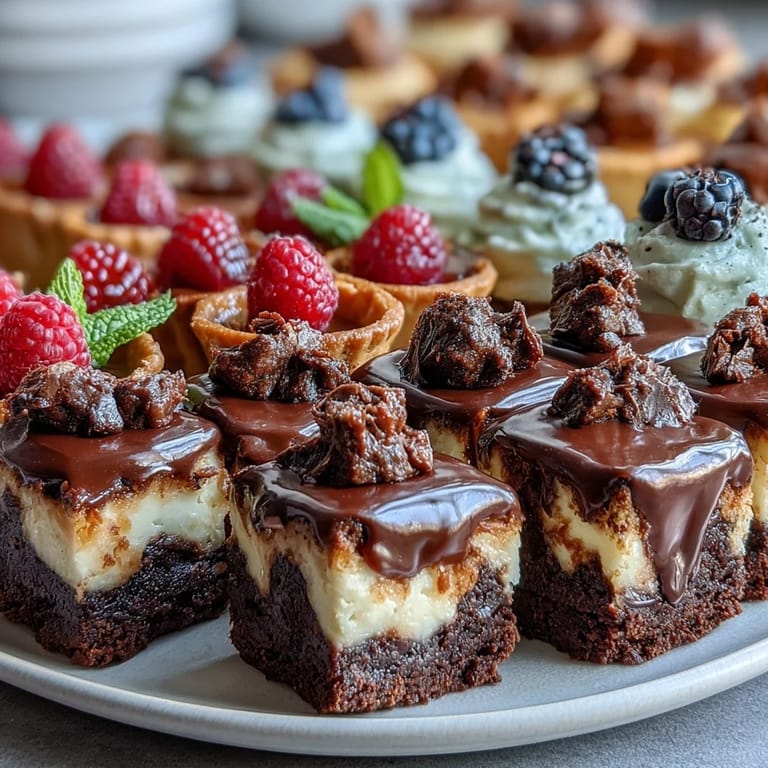
- Fill and top tartlets:
- Once your pastry cream has cooled slightly, spoon it into the tartlet shells and top each one with fresh berries arranged however feels right. The cream will continue to thicken as it cools completely.
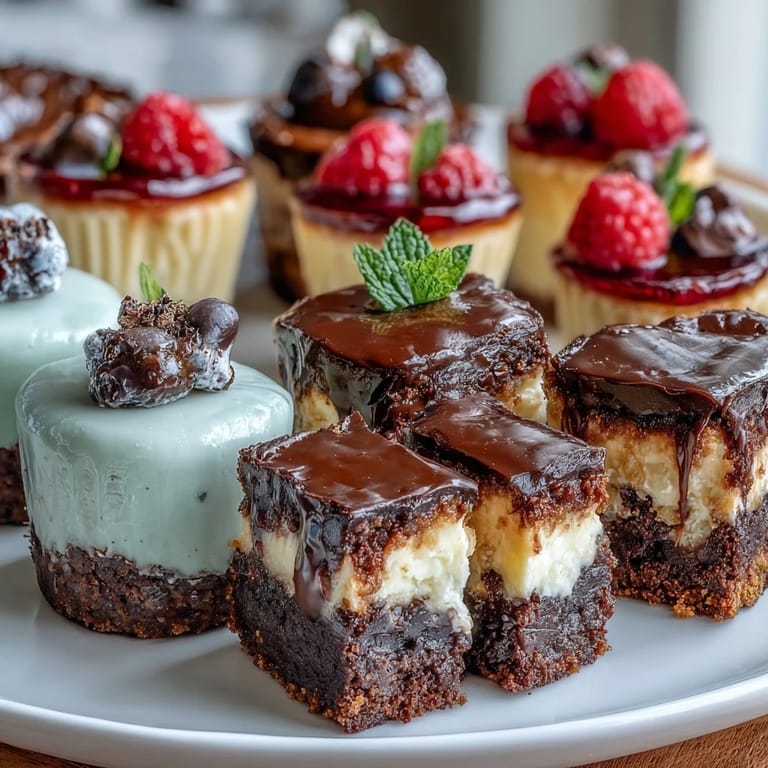
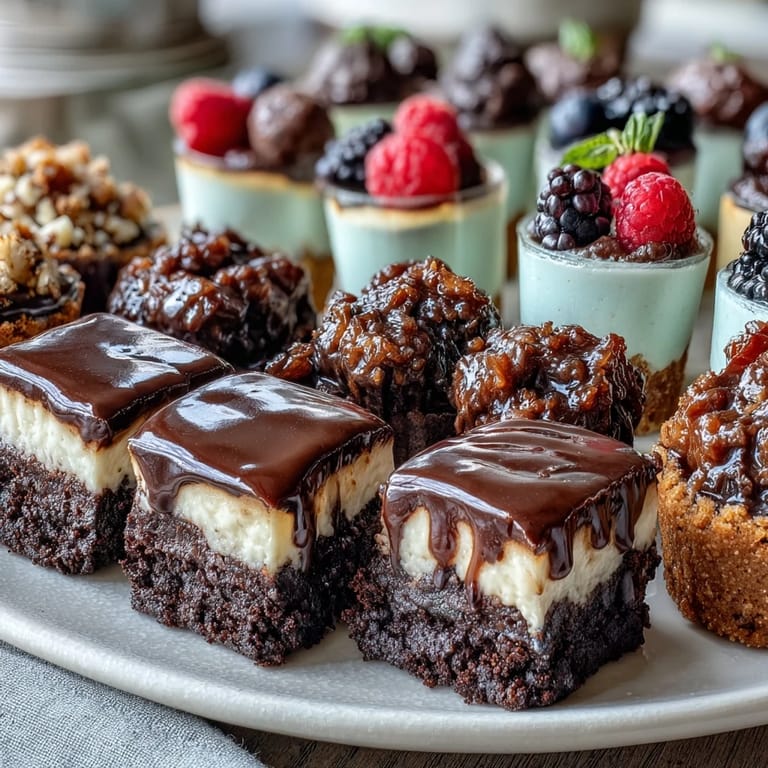
- Arrange your dessert bar:
- Arrange all your mini treats on a tiered stand or platter, grouping by type so the colors and textures create visual interest. A few fresh mint leaves scattered around add that final touch of intentionality.
 Save
Save There was this moment when I presented the finished bar to my neighbor, and she actually gasped—not in a fake way, but in that genuine way that makes you understand why people cook for other people in the first place. She'd been standing in her empty kitchen feeling overwhelmed, and suddenly there was color, variety, and abundance sitting right in front of her, saying wordlessly: someone thinks you're worth celebrating.
Building Your Bar with Confidence
The beauty of this dessert bar is that you don't need to be perfect; you just need to be intentional. Each component can be made separately and at your own pace, which takes the pressure off. I've learned that the visual arrangement matters more than technical precision here; a slightly lopsided brownie still looks charming next to a perfectly smooth cheesecake cup.
Adapting for What You Have
You don't have tartlet tins? Use a shallow muffin tray or even press pastry circles into the cups of a regular muffin tin. Don't have digestive biscuits? Crushed vanilla wafers, shortbread, or even digestive biscuits work beautifully. This recipe thrives on flexibility, and once you understand the basic techniques, you can swap in whatever ingredients your pantry and season offer up without losing the magic.
The Presentation That Matters
The real trick to making this look bakery-worthy is the arrangement and the little finishing touches. I've discovered that grouping treats by type, varying the heights on a tiered stand, and adding fresh garnishes transforms something homemade into something that feels elevated. Your guests will remember how it looked before they remember how it tasted, so take an extra minute to arrange thoughtfully.
- Mint leaves, lemon zest, or a light dusting of cocoa powder: adds visual interest without adding actual work.
- Serve them cold or room temperature depending on the season: cold feels fresher in summer, room temperature feels more indulgent in winter.
- Make these up to two days ahead and refrigerate: they actually taste better once the flavors settle, and it means you can focus on setup and hosting.
 Save
Save This dessert bar has become my go-to move for celebrating someone's new beginning, whether it's a new home, a new job, or just a Sunday that needed something special. It says everything without needing words: I see you, I made something beautiful for you, and you're worth more than one single dessert.
Recipe FAQs
- → What are the main components of the mini treats?
The mini treats include brownie bites, lemon cheesecake cups, and fruit tartlets, each with unique flavors and textures.
- → Can substitutions be made for the crusts or bases?
Yes, crushed digestive biscuits or graham crackers work well for cheesecake cups, and shortcrust pastry is used for tartlets, with room for seasonal adjustments.
- → How should these treats be stored before serving?
Keep chilled until serving, especially the lemon cheesecake cups, to maintain firmness and freshness.
- → What are some pairing suggestions for serving?
Pair with sparkling or sweet dessert wines to complement the rich and fruity flavors.
- → Are gluten-free options possible for these mini treats?
Gluten-free crackers or pastry can replace traditional bases to accommodate dietary needs.