 Save
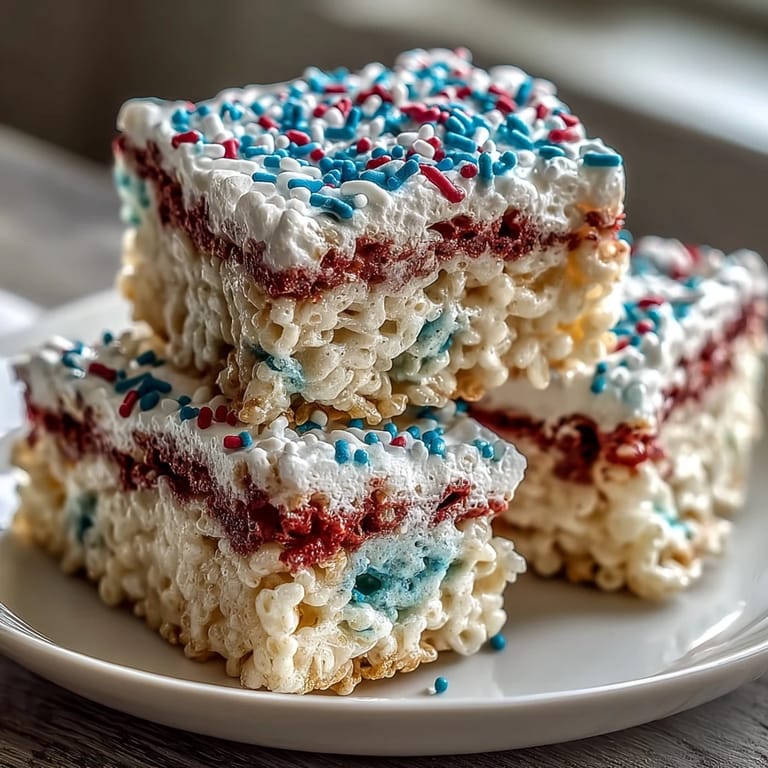
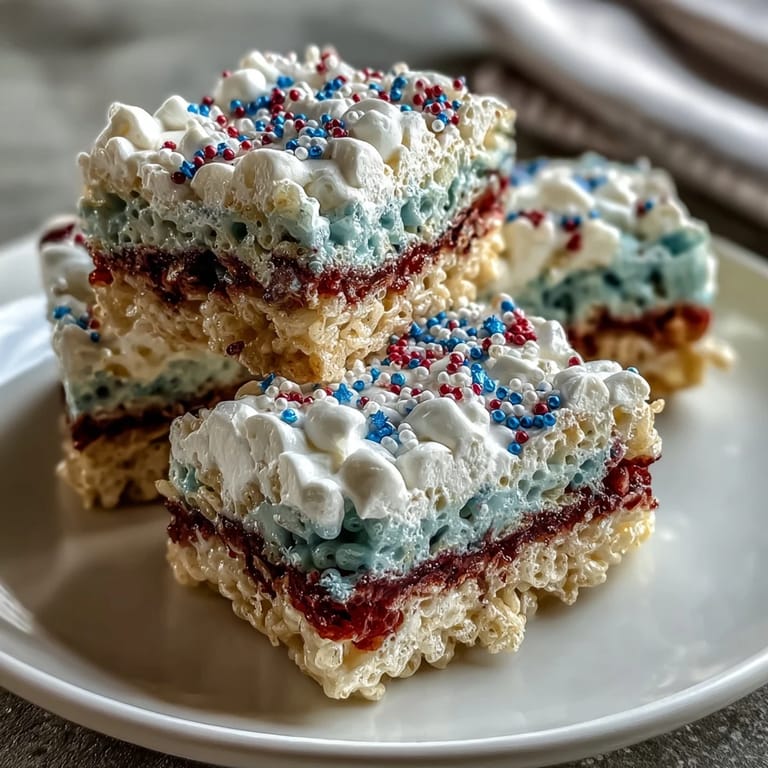
Save My neighbor showed up at my door last summer with a pan of these red, white, and blue Rice Krispies treats, still warm from her kitchen, and I immediately understood why she'd become the unofficial dessert MVP of our block. The moment I bit into that first square—the way the marshmallow gave way to the crispy cereal, the subtle vanilla note threading through the white layer—I knew I had to master this myself. Now whenever the Fourth of July rolls around, my kids stake their claim on being the ones to stir each colored batch, turning what could be a simple recipe into this mini production that somehow feels like the whole point of summer. It's become our thing, the one treat that gets requested weeks in advance and somehow always disappears by the end of the day.
I made these for the first time at my sister's house during a chaotic Fourth of July gathering where the grill had caught fire (don't ask) and everything felt like it was falling apart. But standing there pressing marshmallow mixture into a pan while my niece decorated the top with sprinkles, something shifted—suddenly we had this beautiful, ridiculous patriotic creation that made everyone laugh and forget about the smoke. That's when I realized these treats aren't really about the recipe; they're about having something to do together that ends with something sweet.
Ingredients
- Rice Krispies cereal: Use the standard version for that signature crispy texture; don't swap in store brands unless you're okay with a slightly different crunch and density.
- Mini marshmallows: They melt faster and more evenly than large ones, and the smaller pieces help the coloring distribute without creating weird streaks.
- Unsalted butter: Dividing it into three portions keeps you in control of the flavor for each layer, and it prevents the white layer from tasting too rich.
- Vanilla extract: This is your secret weapon for the white layer—it adds depth without needing any color, making that middle stripe taste like something special.
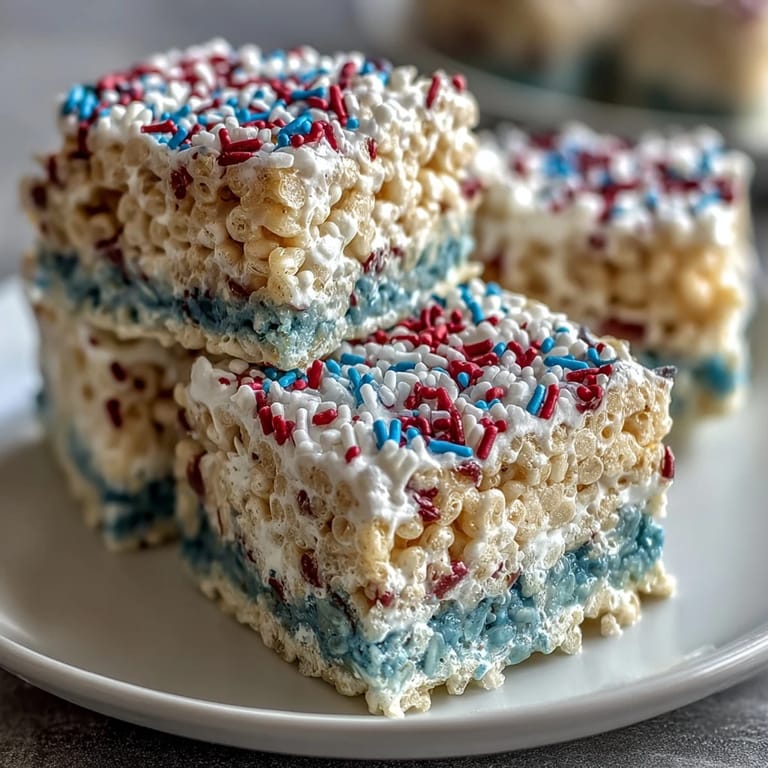
- Gel food coloring: This is non-negotiable if you want those jewel-toned reds and blues; liquid food coloring will make your mixture weepy and sad.
- Red, white, and blue sprinkles: These are purely optional but they do turn the whole thing into an edible flag, which feels intentional rather than accidental.
Tired of Takeout? 🥡
Get 10 meals you can make faster than delivery arrives. Seriously.
One email. No spam. Unsubscribe anytime.
Instructions
- Prep your pan like you mean it:
- Line that 9x9-inch pan with parchment paper so thoroughly that when you're done, you can just lift the whole thing out without it crumbling everywhere. A light greasing keeps things from sticking where the paper meets the corners.
- Divide everything into thirds:
- Measure out your marshmallows and butter so each color gets exactly the same amount—this keeps your layers balanced and prevents one color from dominating the others.
- Make the red layer first:
- Melt your butter slowly over low heat, add the marshmallows, and stir constantly until they're completely smooth; this should take maybe three minutes. When the mixture is uniform, add just a few drops of red gel coloring and stir until you get a shade that makes you happy, then fold in your Rice Krispies gently so they all get coated.
- Press it down with intention:
- Use either damp hands or a lightly greased spatula to press this layer firmly but not aggressively into the pan; you want it compact but not compressed into a brick. Wipe down your saucepan with a clean paper towel before starting the next layer.
- Create the white layer:
- Repeat the melting process with your second batch of butter and marshmallows, then stir in that vanilla extract so it gets evenly distributed throughout. The vanilla will smell incredible and taste even better, giving this middle layer its own personality.
- Layer it gently:
- Press the white mixture over the red layer using the same technique; the warmth of the new layer will help it bond slightly with what's underneath. Clean your pan again before the final layer.
- Top with patriotic blue:
- Melt your last batch of butter and marshmallows, add blue gel coloring (this is where you can be bold with the color), then fold in the remaining Rice Krispies. Press this final layer over the white, being extra gentle so you don't accidentally blend the colors together.
- The sprinkle moment:
- While everything is still slightly warm but not hot, scatter your red, white, and blue sprinkles across the top if you're using them; they'll stick better this way. Let the whole thing sit undisturbed for at least an hour so the marshmallow can set completely.
- The big reveal:
- Once it's cooled, use the parchment paper to lift the entire block out of the pan, place it on a cutting board, and slice into sixteen equal squares with a sharp knife (a tiny dip in water between cuts helps prevent sticking). Serve immediately or store in an airtight container.
 Save
Save My son brought a box of these to school for a class party, and his teacher texted me later saying he'd explained the patriotic layers to every single kid before they ate one—like he'd invented them himself. I didn't correct him, just smiled, because that's exactly what these treats do: they turn a simple recipe into something worth talking about.
The Marshmallow Science Behind the Layers
The reason these layers stay distinct instead of melting into each other has everything to do with how quickly marshmallows set. Each new layer is warm enough to stick to the previous one, creating a bond, but cool enough at its surface that it begins setting while you're pressing down the next batch. It's like watching a very slow-motion magic trick where three separate things become one cohesive creation, and understanding that process helps you appreciate why the timing matters and why rushing is where everything falls apart.
Making Them Your Own
Once you've nailed the basic three-layer version, the door opens to all kinds of experiments. I've made versions with just red and white for Canada Day, added a tiny pinch of sea salt to each layer for depth, and once tried almond extract instead of vanilla in the white layer, which was delicious in a completely different way. The formula is flexible enough to play with, which means these treats can evolve as your tastes change and as you discover what your family actually gravitates toward.
Storage and Serving Wisdom
These treats are best eaten within three days because the marshmallow eventually starts to harden and loses that perfect chewy texture that makes them worth eating. Store them in an airtight container at room temperature away from direct sunlight, which can fade those beautiful colors you worked to create. They travel surprisingly well, so they're perfect for potlucks, picnics, or just having on hand when unexpected guests arrive hungry.
- If your kitchen is particularly warm or humid, the treats might take longer to set, so give them extra time rather than risking a structural failure.
- A serrated knife works better than a chef's knife for slicing because it grabs the treats instead of squishing them.
- These are vegetarian but not vegan due to the butter and marshmallows, so keep that in mind when thinking about who to serve them to.
 Save
Save These treats have somehow become the dessert that shows up in my mental highlight reel of summer, the kind that makes people smile before they even taste them. There's something about red, white, and blue layered together that turns a simple marshmallow creation into a tiny edible celebration.
Recipe FAQs
- → What colors are used for the layers?
The layers feature red, white, and blue hues achieved with gel food coloring mixed into marshmallow blends.
- → How do you prevent sticking while shaping the layers?
Lightly greasing your hands or a spatula helps press the sticky layers evenly without sticking.
- → Can these treats be prepared ahead of time?
Yes, allow them to cool and set for at least an hour, then store in an airtight container for up to three days.
- → Are there any allergen concerns?
These treats contain milk from butter and may include gelatin from marshmallows; check cereal packaging for gluten info.
- → What tools are needed to make these layers?
A large saucepan, 9x9 inch baking pan lined with parchment, mixing spoon or spatula, and a knife for slicing are required.
- → How is vibrant coloring achieved without wetting the mixture?
Using gel food coloring ensures bright, vivid layers without adding extra moisture that liquid coloring can cause.