 Save
Save The vibrant speckle of Easter egg candies caught my eye one chilly spring afternoon, and suddenly the kitchen felt alive with possibility. I decided to experiment—armed with a jar of peanut butter and a handful of pastel chocolates picked up (almost impulsively) from the market. There was a certain lively hum in the house, thanks to kids running by and sunlight glinting through the windows. Something about the peanut butter's creamy scent mingling with the melted butter made me grin; it felt playful, not at all serious. The first time, I wasn't sure if the bars would hold together, but their chewiness and cheerful colors made them an instant hit for our spring get-togethers.
I first baked these bars for a neighborhood potluck where I volunteered to bring dessert, and quickly became the center of laughter when my pan was the only dish left empty by the end. Everyone wanted the secret behind the soft texture and candy-laden topping. My friend Anna confessed she'd never seen her toddler devour anything quite so quickly. The easy lift-out unpan technique saved me from a sticky disaster, too—I learned parchment paper isn't just for professionals. Whenever I bake these, I remember the way those bright candies sparked so many grins around the table.
Ingredients
- Unsalted butter (1/2 cup, melted): Using melted butter ups the chewiness and helps blend all the sugars smoothly, just be sure it's not piping hot or it will scramble your eggs.
- Creamy peanut butter (3/4 cup): This is the soul of the bars—a good quality peanut butter makes the flavor shine.
- Light brown sugar (1 cup, packed): Brings a subtle molasses depth and keeps the texture fudgy instead of crumbly.
- Granulated sugar (1/4 cup): Balances the brown sugar and helps with that cookie bar glossy top.
- Eggs (2 large): Bind everything and make for a softer, richer bar, so crack them gently and whisk well.
- Vanilla extract (1 teaspoon): A splash rounds out the sweetness and echoes classic cookie flavors.
- All-purpose flour (1 1/2 cups): Measure lightly so the bars stay tender.
- Baking powder (1/2 teaspoon): Gives a gentle lift without fluffing the bars too much.
- Baking soda (1/4 teaspoon): A small amount works with the brown sugar to subtly enhance chewiness.
- Salt (1/4 teaspoon): Pinches down the sweetness and wakes up the peanut butter.
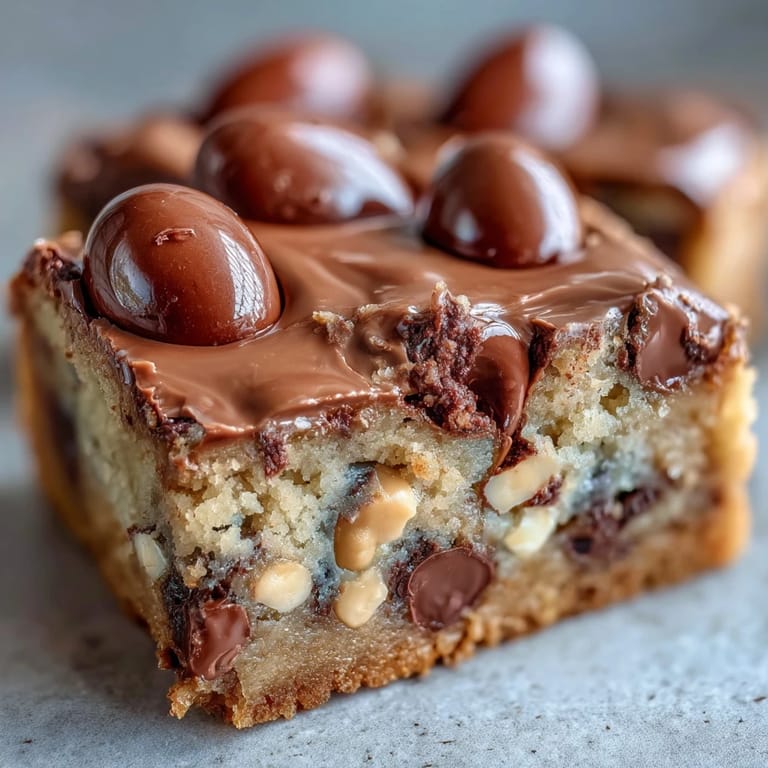
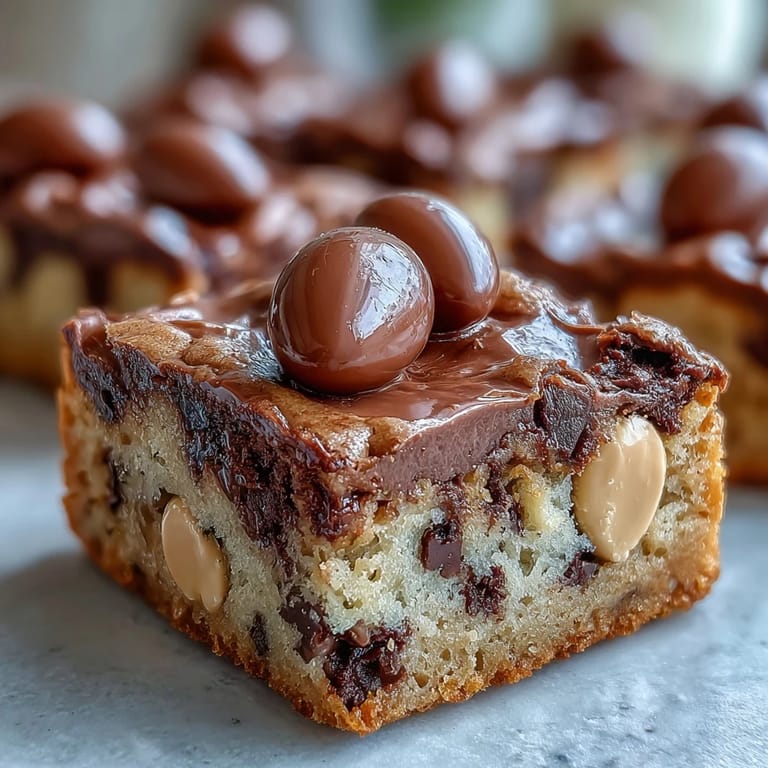
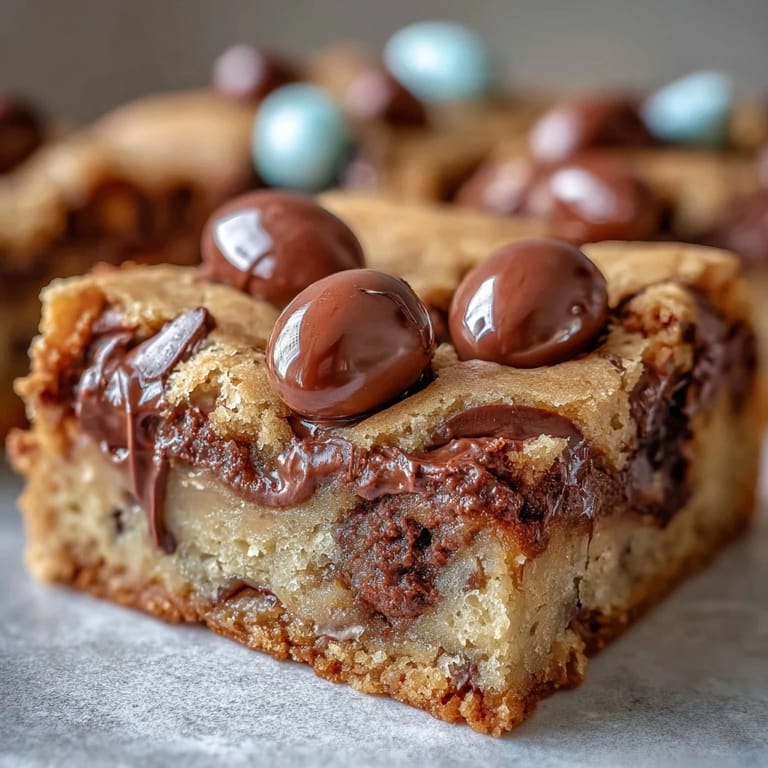
- Easter egg chocolate candies (1 cup plus extra for topping): These provide pops of color and crunch—use your favorite mini eggs for the best result.
- Semi-sweet chocolate chips (1/2 cup, optional): Add only if you crave an extra chocolate boost; they melt into the bars for pockets of gooeyness.
Tired of Takeout? 🥡
Get 10 meals you can make faster than delivery arrives. Seriously.
One email. No spam. Unsubscribe anytime.
Instructions
- Set up your pan:
- Line your 9x9 baking pan with parchment paper—leave some paper hanging over the sides so you can lift the bars out later without stress.
- Blend the wet ingredients:
- Whisk melted butter and peanut butter until creamy and smooth, then stir in brown sugar and granulated sugar and watch the texture go thick and shiny.
- Add eggs and vanilla:
- Crack in the eggs and spoon in vanilla; whisk until glossy and everything looks uniform, no streaks left behind.
- Mix the dry ingredients:
- In a separate bowl, swiftly stir together flour, baking powder, baking soda, and salt so the leaveners are evenly distributed.
- Combine and fold:
- Gently fold the dry mixture into the wet, using a spatula and stopping once just barely blended—overmixing will make them tough.
- Add candies and chips:
- Pour in the Easter egg candies and chocolate chips, folding just enough so they’re scattered throughout but not crushed.
- Spread and decorate:
- Spoon the dough into the pan and smooth with a spatula, then press a handful of extra mini eggs on top for maximal color.
- Bake:
- Slide the pan onto the center rack and bake for 22-25 minutes, until the edges turn golden and the center feels set but still soft to the touch.
- Cool and slice:
- Let bars cool completely in the pan—lifting them out with the parchment makes neat slices and avoids messy hands.
 Save
Save One spring, my cousin brought her twins over and we made these together, flour dusting our noses and giggles echoing against the kitchen walls. It surprised me how quickly the recipe came together—and how the kids picked out their favorite colored eggs to press on top. After baking, we all crowded the counter, impatiently waiting for the bars to cool, and someone suggested we “test” a corner piece while they were still warm (which quickly turned into two, then three pieces vanishing). That moment made these bars feel like more than just dessert—they became a joyous, shared tradition. The scent of peanut butter and chocolate in the air meant the kitchen felt like spring regardless of the weather.
Making These Bars Your Own
Trying different candies and chocolate chips can give the bars a personalized twist—sometimes I toss in caramel chips or use leftover Halloween chocolates for a playful remix. Swapping the pastel eggs for colorful sprinkles means you can bring these out for any festive occasion, not just Easter. If you love nuts, a handful of chopped roasted peanuts will add crunch and a savory depth. I once used cashew butter for a friend with peanut allergies, and while the taste changed, the cheerful spirit carried through. These bars really let you play with whatever’s in your pantry.
Quick Storage & Serving Tips
Bars stay soft and chewy for days if kept in an airtight container—you can even freeze them in batches for a last-minute sweet fix. Warm them for ten seconds in the microwave and that chocolate goes extra gooey. For parties, I sometimes slice them smaller for bite-sized treats, which disappear faster than you’d think. Staying organized with storage means every late-night snack is as delicious as the first bite. Don’t forget parchment paper when freezing so they don’t stick together.
Troubleshooting Common Mishaps
Sometimes the bars turn out underbaked if your oven runs cool, so check by gently pressing the center—it should bounce back slightly, not feel liquidy. If too crumbly, it’s likely from packing the flour—measure lightly, fluff it before scooping. Overbaking dries out the edges, so keep a close eye and start testing at 22 minutes. The candies can sometimes sink if the dough is too warm; chill your dough briefly if needed before pressing on the eggs.
- Let the bars cool fully before slicing for the cleanest edges.
- Don’t panic if the center looks a bit soft—it sets as it cools.
- Variety in candy colors makes every batch feel special.
 Save
Save These cookie bars always bring laughter and color to my kitchen, even on rainy spring afternoons. Sharing them feels like sending a little bit of brightness home with everyone who grabs a bar.
Recipe FAQs
- → Can I use chunky peanut butter instead of creamy?
Yes, chunky peanut butter adds texture, though creamy blends more smoothly for a soft bite.
- → Are other candies suitable if Easter eggs are unavailable?
Any chocolate-coated candies, like M&M's or chocolate chips, work nicely all year round.
- → How do I store these bars?
Keep bars in an airtight container at room temperature for up to four days to maintain freshness.
- → Can these bars be made gluten-free?
Substitute all-purpose flour for a gluten-free blend to make the bars suitable for those with gluten allergies.
- → Is melted butter necessary or can I use softened?
Melted butter ensures an extra-chewy texture. Using softened butter will yield a cakier result.
- → What size pan is best for baking these bars?
A 9x9-inch (23x23 cm) pan yields even, thick bars and ensures proper baking time and texture.