 Save
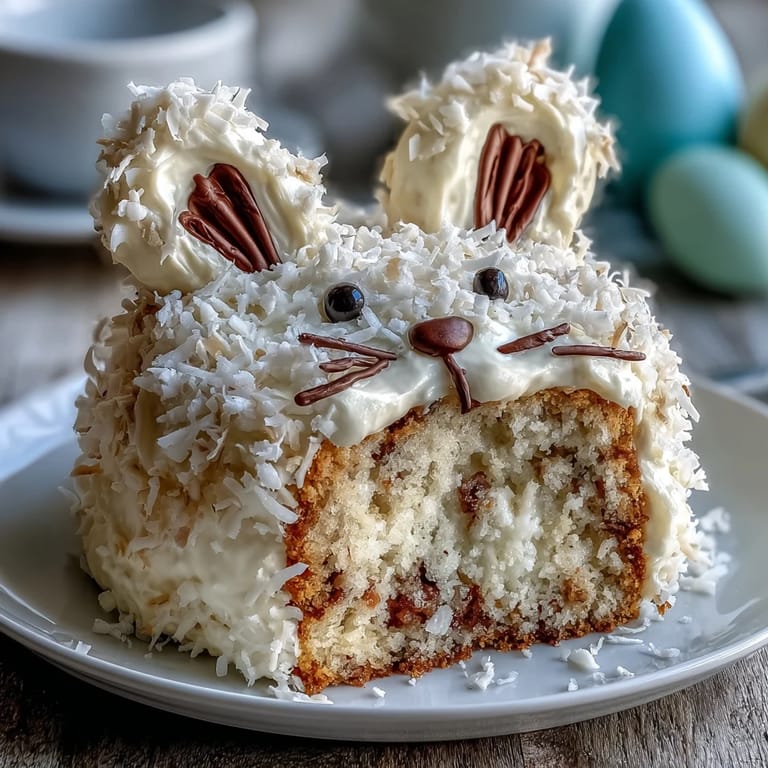
Save My daughter came home from school with a poster of a glittery Easter bunny, and before I could even say hello, she was tugging my sleeve asking if we could make one. I'd never shaped a cake before, but something about her enthusiasm made me want to try. We spent that Saturday afternoon arranging cake pieces like we were solving the sweetest puzzle, and by the time those gold sprinkles caught the kitchen light, I understood why she'd been so eager. That cake became less about Easter and more about watching her face light up as we added each ridiculous detail together.
My friend Lisa came to Easter dinner skeptical that a homemade bunny cake could actually work, but the moment she walked in and saw it on the table, her whole face changed. She spent half the meal taking photos from different angles, and I realized this cake does something special—it makes people happy before they even taste it. When we finally cut into it and everyone got that first bite of tender, buttery cake, the photos stopped and the smiling started.
Ingredients
- All-purpose flour (2 ½ cups): Use the spoon-and-level method rather than scooping straight from the bag, which packs too much flour and makes the cake dense.
- Baking powder (2 ½ tsp): Check the expiration date before you start; old baking powder won't give you that fluffy crumb you're counting on.
- Salt (½ tsp): Never skip it, even though it seems small—it sharpens the vanilla and balances the sweetness beautifully.
- Unsalted butter (1 cup for cake, 1 cup for frosting): Room temperature is non-negotiable if you want smooth, fluffy results without overworking the mixer.
- Granulated sugar (2 cups): The creaming process is where the magic happens, so don't rush this step or your cake will be heavy.
- Eggs (4 large, room temperature): Cold eggs don't incorporate smoothly, so pull them out of the fridge while you're prepping everything else.
- Pure vanilla extract (1 tbsp for cake, 1 tbsp for frosting): The real stuff makes all the difference; imitation will flatten the flavor.
- Whole milk (1 cup): The alternating method keeps the batter from becoming overworked and tough.
- Powdered sugar (4 cups, sifted): Sifting prevents lumps that show up later when you're trying to create smooth frosting.
- Shredded coconut (1 cup sweetened): This becomes your bunny's fluffy coat, so press it on while the frosting is still slightly sticky.
- Pink gel food coloring: Gel holds up better in frosting than liquid coloring, which can make everything too thin.
- Marshmallows (2 large, 2 mini): The large ones become cheeks and somehow look more intentional than other options.
- Black licorice or gel icing: Licorice laces look charming but gel is easier to control if you're nervous about your decorating skills.
- Gold sprinkles (edible): These create that signature sparkle and make the whole cake feel like a celebration.
Tired of Takeout? 🥡
Get 10 meals you can make faster than delivery arrives. Seriously.
One email. No spam. Unsubscribe anytime.
Instructions
- Heat your oven and prep the pans:
- Set the oven to 350°F and take a moment to grease and flour those cake pans thoroughly—any dry spots will stick later. If you have parchment paper rounds, use those instead; they're your secret insurance against cake disasters.
- Combine your dry ingredients:
- Whisk flour, baking powder, and salt in a medium bowl until they look evenly mixed. This step aerates the flour and distributes the leavening, so don't skip it even though it seems simple.
- Cream butter and sugar into fluffy clouds:
- Beat them together for 3 to 4 minutes until the mixture is pale and noticeably lighter; this is where air gets trapped in the batter, which creates that tender crumb. Stop occasionally and scrape down the bowl so nothing hiding on the sides gets left behind.
- Add eggs one at a time with care:
- Each egg should be fully incorporated before you add the next; this takes about 30 seconds of beating per egg. The mixture might look curdled after the first egg or two, but it smooths out as you keep going.
- Stir in vanilla extract:
- A single tablespoon makes more difference than you'd expect, so measure carefully.
- Alternate flour and milk gently:
- Start with flour, then milk, then flour, ending with flour—this pattern prevents the batter from becoming tough. Mix on low speed just until combined after each addition; overmixing at this point is the enemy.
- Divide batter and bake:
- Split the batter evenly between your pans and bake for 30 to 35 minutes until a toothpick comes out clean. The kitchen will smell incredible, and the cakes should be golden and spring back slightly when you touch the top.
- Cool with patience:
- Leave cakes in the pans for 10 minutes so they set enough to handle, then turn them onto wire racks to cool completely. Trying to frost a warm cake is a recipe for sliding frosting, so brew some tea and wait.
- Make buttercream frosting:
- Beat softened butter until creamy, then gradually add sifted powdered sugar a little at a time so you don't create clouds of sugar dust everywhere. Add milk, vanilla, and salt, then beat until the frosting is fluffy and spreadable, about 2 to 3 minutes more.
- Plan your bunny shape:
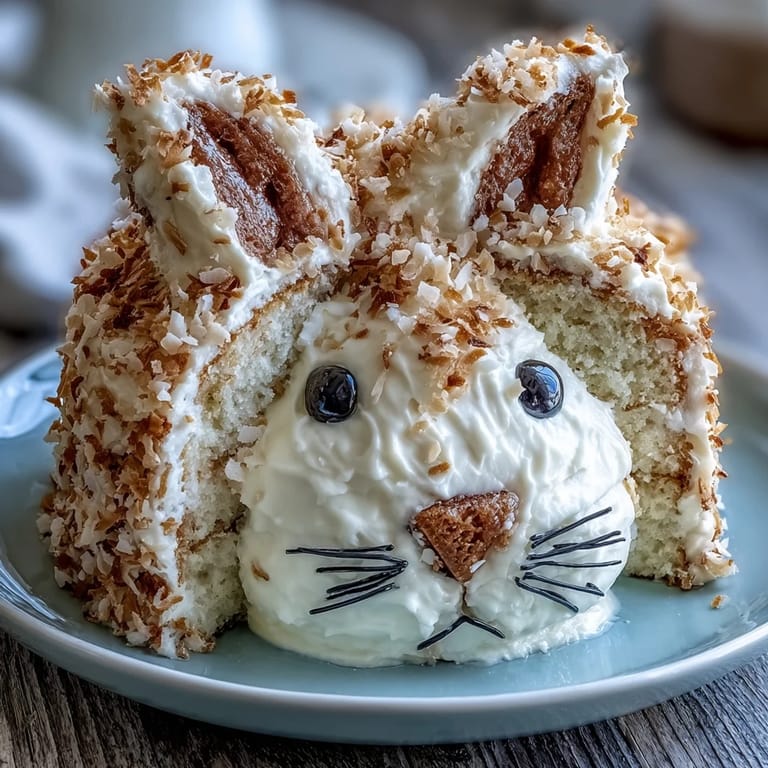
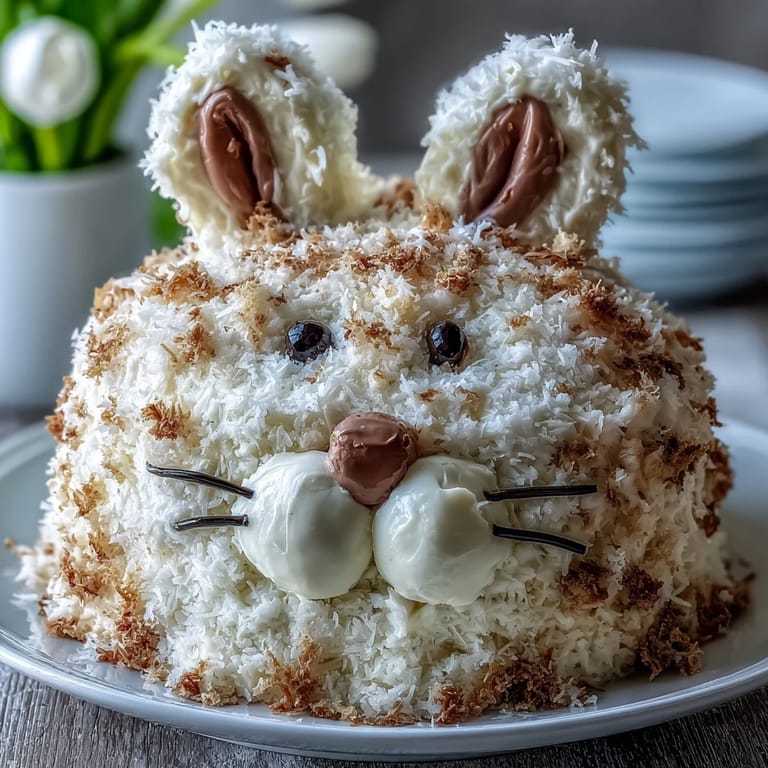
- One whole cake round becomes the bunny's face; cut two ovals from the second round for ears. The leftover piece can be shaped into a bowtie.
- Arrange on your platter:
- Play around with the arrangement before you frost anything; sometimes the bunny needs the ears a little higher or the bowtie repositioned for balance.
- Apply a crumb coat:
- Spread a thin layer of frosting over all the pieces to seal in crumbs, then chill for 20 minutes. This step prevents stray cake bits from ending up in your final frosting layer.
- Frost generously:
- Apply a thicker, more luxurious layer of buttercream now that the crumb coat is set. Use an offset spatula for smoother coverage.
- Add coconut fur:
- Press shredded coconut onto all the frosted surfaces while the frosting is still sticky; it'll hold better this way. Work in sections so the frosting doesn't dry out.
- Create the face details:
- Tint some coconut with pink gel coloring for the inner ears and nose; place marshmallows for cheeks and tiny marshmallows for teeth. Use black licorice or gel to draw whiskers and eyes.
- Finish with gold sparkle:
- Sprinkle the gold sprinkles generously over the whole bunny, letting some catch the light from different angles. This is the moment the cake transforms from cute to magical.
 Save
Save There's something about watching a cake transform from separate cake pieces into a recognizable bunny that makes you feel like an actual baker. By the time you press that last sprinkle into place and step back to admire it, you've created something that's equal parts delicious and adorable—and that's a rare combination worth celebrating.
Making This Cake Your Own
The basic vanilla cake is forgiving enough to play with once you understand the structure. If chocolate is more your speed, swap out half a cup of the flour for unsweetened cocoa powder and reduce the milk slightly since cocoa absorbs more liquid. You could also tint the frosting pastel shades instead of white, or swap the coconut for crushed cookies if someone at your table can't have tree nuts. The bunny shape is just one idea—you could arrange the pieces into a different animal or skip the shaping entirely and make a regular layer cake if cutting feels intimidating.
Timing and Storage Wisdom
This cake doesn't require any fussy timing on the day you serve it; you can actually bake it up to two days ahead, wrap it, and frost it the morning of your gathering. The coconut and marshmallows look best applied the day of so everything stays fresh and bright. If you're dealing with a warm kitchen, keep the finished bunny in a cool spot rather than the fridge, which can cause condensation and make the decorations weep; just cover it loosely with a cake box or large container.
Decorating Tips and Tricks
The decorating step is where your personality shines, so don't stress about making it perfect. Slightly crooked eyes and whiskers that aren't exactly symmetrical actually add charm rather than detract from it. If you're not confident with a piping bag, use a toothpick to smooth frosting or adjust decorations after you place them. Here are the small moves that make a difference:
- Place marshmallows gently but firmly so they stay put without sinking into the frosting.
- Let gel icing dry for a minute or two before you add gold sprinkles so the sprinkles don't slide off immediately.
- If coconut feels sparse, don't be shy—more texture makes the bunny look fluffier and more finished.
 Save
Save This cake has a way of becoming a memory as much as a dessert—something people talk about for years because it surprised them with how special a homemade effort could feel. Make it for someone you love, and watch what happens.
Recipe FAQs
- → How do you achieve the bunny shape?
Use two round cakes; one forms the face, cut ovals from the second for ears and leftover as a bowtie, then arrange on a platter before frosting.
- → What frosting is used for this cake?
A classic buttercream frosting with butter, powdered sugar, vanilla, milk, and a pinch of salt creates a smooth and fluffy coating.
- → How is the furry texture created on the cake?
Sweetened shredded coconut is pressed onto the buttercream to mimic bunny fur, with tinted coconut used for ears and nose details.
- → Can the cake be made chocolate-flavored?
Yes, substitute half a cup of flour with unsweetened cocoa powder for a chocolate version of the cake.
- → What is the best way to decorate the bunny's face features?
Use marshmallows for cheeks and teeth, black licorice or gel icing for eyes and whiskers, and pink gel for coloring ears and nose.
- → How long does the cake keep fresh?
Store at room temperature covered for up to 2 days or refrigerate for up to 5 days to maintain freshness.