 Save
Save My coworker Sarah brought these to the office last March, and I watched people gravitate toward them like they were made of actual gold. She'd arranged them on a platter so carefully, each shamrock catching the light just right, that it felt almost wrong to eat one. That moment I understood the magic isn't in complexity—it's in turning something playful into something people actually want to grab. Now every St. Patrick's Day, my kitchen smells like melted green candy and possibility.
I made a batch for my daughter's school party last year, and three kids asked for the recipe because they wanted to make them at home. That's when I realized these aren't just snacks—they're edible conversation starters that somehow make people feel celebrated. Watching someone bite into that green coating and get that little crunch of pretzel? That's the real holiday magic.
Ingredients
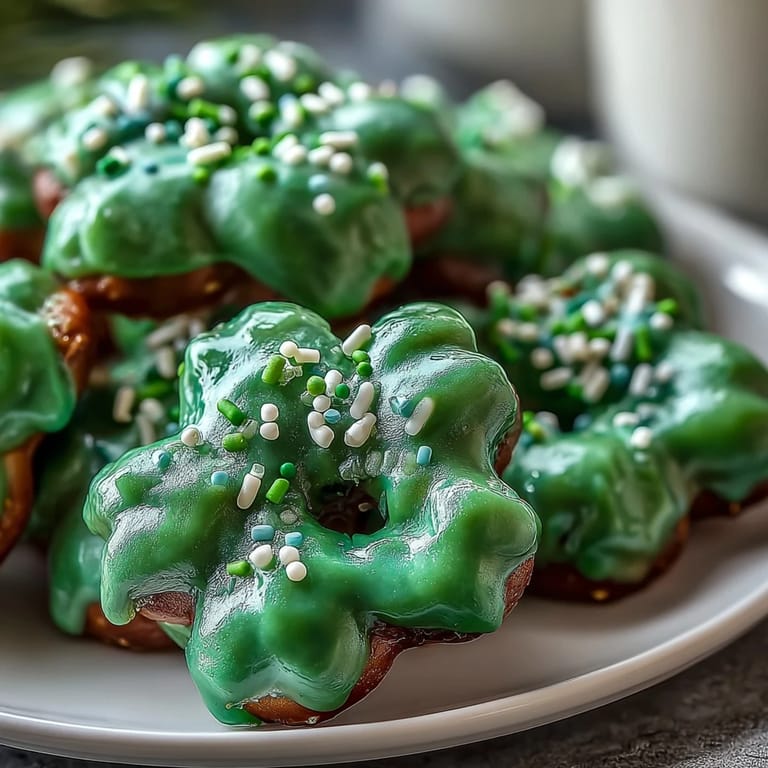
- Pretzel twists (90 small ones): These are your canvas, and their natural curves actually form the clover shape without any fussing—buy the plain salted kind since the candy coating brings all the sweetness.
- Mini pretzel sticks (30 of them): The stem that holds your shamrock together, so don't skip these or your bites will feel incomplete.
- Green candy melts (340 g): The binding agent and color hero—I learned the hard way that cheaper brands sometimes seize up, so invest in decent ones or make white chocolate work with a drop of green food coloring.
- Coconut oil or vegetable shortening (1 tsp optional): This is your secret weapon if your candy coating gets too thick; it thins it out without affecting flavor or texture.
- Green and white sprinkles or sanding sugar: The confetti that makes these feel festive—apply while wet or they won't stick, and honestly, the combination of colors makes them way more striking.
Tired of Takeout? 🥡
Get 10 meals you can make faster than delivery arrives. Seriously.
One email. No spam. Unsubscribe anytime.
Instructions
- Set your stage:
- Line your baking sheet with parchment paper so nothing sticks and cleanup becomes actually pleasant. This simple step saves so much frustration later.
- Build your shamrocks:
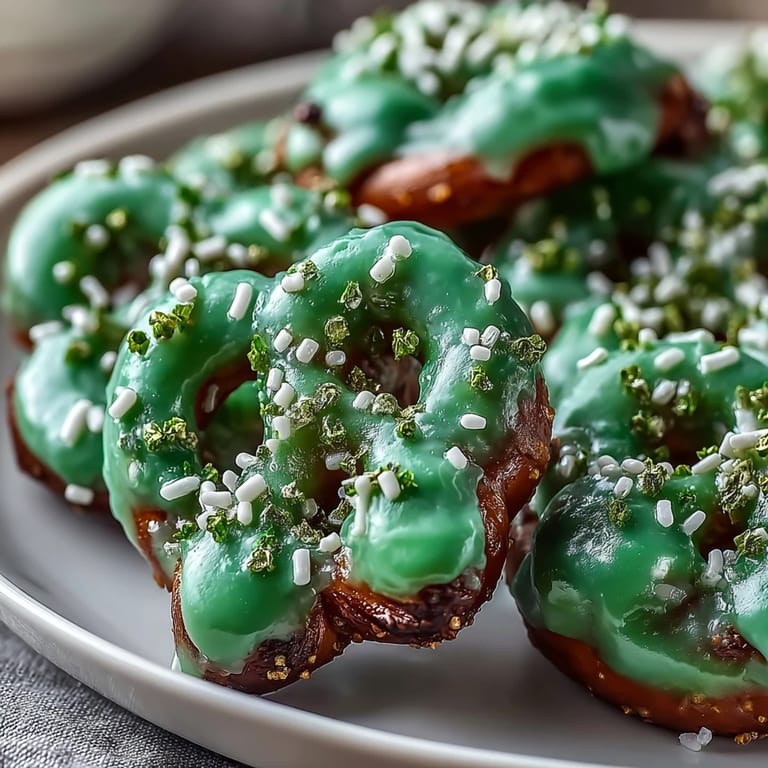
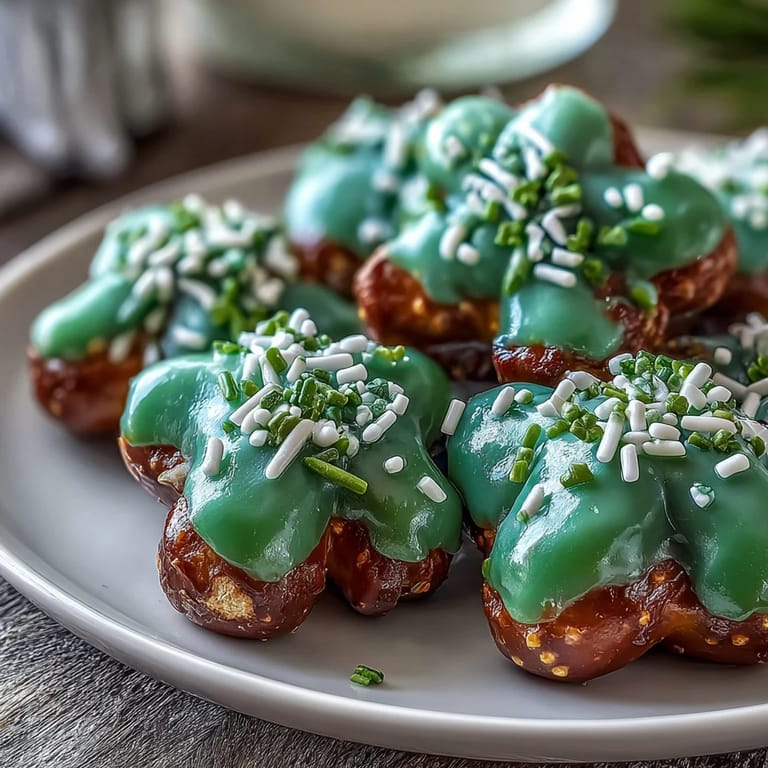
- Take three pretzel twists and curve them so their bends touch in the middle, creating that natural three-leaf clover look—it's almost meditative, arranging them over and over. Place one mini pretzel stick at the base as your stem and step back to see how charming they already look.
- Melt with intention:
- Microwave your green candy melts in 30-second bursts, stirring between each, so you don't overheat them and turn them grainy. If the mixture looks too thick, stir in that optional coconut oil and watch it transform into a silky coating.
- Coat and celebrate:
- Use a fork or spoon to drizzle the melted candy over each shamrock, making sure the pretzels bond together in the coating—you're not drowning them, just connecting the pieces. The moment it hits the pretzel, you'll hear that satisfying little sizzle.
- Sprinkle while courage lasts:
- Work quickly before the coating sets, sprinkling your green and white toppings generously across each bite. This is where patience matters because the coating will start firming up fast, but that's also your signal you're almost done.
- Let time do its work:
- Set them on the counter for 20 minutes and resist the urge to poke them—they're setting perfectly in room temperature air. If you're impatient like me, a quick 10-minute refrigerator stint gets you there faster.
- The gentle release:
- Once set, peel them off the parchment slowly so you don't crack them, and arrange them on your serving platter like the little edible treasures they are.
 Save
Save My neighbor knocked on the door last spring asking if I'd made those green pretzel things again because her kids wouldn't stop talking about them. That knock reminded me that food becomes memory when it shows people you noticed the season, celebrated with them, or just made something thoughtfully good for a moment.
The Pretzel Choice Matters
Not all pretzel twists are created equal, and I've learned this through several experimental batches. The ones labeled as "bite-sized" work better than regular-sized pretzels because they arrange into perfect shamrocks without looking awkward or oversized. I also discovered that fresher pretzels stay crunchier under the coating, so buying them from a store with good turnover actually changes the final texture.
Color and Coating Creativity
Green candy melts are straightforward, but sometimes I get adventurous and wonder what white chocolate with a tiny bit of green food coloring would taste like. My daughter actually prefers that version because it's less intensely sweet, and honestly, the coating color comes out more subtle and elegant—which somehow makes these feel less like novelty snacks and more like actual treats.
Storage and Gifting Strategy
These keep beautifully in an airtight container for up to five days, so you can make them on Friday and still have them fresh for Sunday gatherings. I've started packaging them in little cellophane bags tied with green ribbon because people appreciate homemade gifts more when they feel intentional and thoughtfully wrapped.
- Keep them at room temperature away from direct sunlight or they'll look dull and the coating might get sticky.
- If you're gifting them, add a little note about the five-day window so recipients know exactly when to enjoy them.
- Pack them in a single layer if possible—stacking creates pressure that can crack the candy coating.
 Save
Save These pretzel bites prove that celebration doesn't require hours in the kitchen or complicated techniques—just a little thoughtfulness and green food coloring. Make them because they're easy, but people will remember them because they taste like you cared.
Recipe FAQs
- → How do I shape the pretzels into shamrocks?
Arrange three small pretzel twists with their curves touching to form the three leaves, then add a mini pretzel stick as the stem to complete the shamrock shape.
- → Can I substitute green candy melts with something else?
Yes, white chocolate with green food coloring works well as an alternative for the coating.
- → What is the best way to achieve a smooth candy coating?
Adding a teaspoon of coconut oil or vegetable shortening to the melted candy melts helps create a smoother and easier-to-drizzle coating.
- → How long does it take for the candy coating to set?
The coating sets at room temperature in about 20 minutes or can be refrigerated for 10 minutes to firm up faster.
- → How should these pretzel bites be stored?
Store in an airtight container at room temperature for up to five days to maintain freshness and crunch.