 Save
Save My teenager came home from a Halloween party last year talking about these vampire bite cookies someone's mom had made, and I could tell by the way she described them—the red icing dripping like blood, the little puncture marks—that they were meant to be theatrical and fun, not creepy. So I set out to master them, and what started as a simple project turned into an annual tradition where we spend an afternoon creating what feels like edible horror-movie props. The best part? They're just soft, buttery sugar cookies dressed up in their spookiest outfit.
I'll never forget the moment my daughter bit into one of her creations and the red icing got on her face, and she looked in the mirror and screamed—but in that delighted, theatrical way that made everyone at the party laugh. That's when I realized these cookies weren't really about being scary; they were about creating a moment where everyone could play pretend together.
Ingredients
- All-purpose flour (2 1/4 cups): This is your foundation, and scooping it properly matters more than you'd think—I learned to spoon it into the measuring cup and level it off rather than scooping straight from the bag, which keeps the dough from getting tough.
- Unsalted butter (3/4 cup, softened): Softened butter creams beautifully with sugar and gives these cookies their tender, melt-in-your-mouth quality; take it out of the fridge about 30 minutes before you start.
- Granulated sugar (1 cup): This sweetens the dough and helps create that slightly crispy edge while keeping the center soft.
- Baking powder (1/2 tsp): Just enough to give the cookies a gentle lift without making them cake-like.
- Salt (1/4 tsp): A pinch of salt enhances the butter flavor and balances the sweetness.
- Large egg (1): This binds everything together and adds richness; make sure it's at room temperature so it mixes evenly.
- Pure vanilla extract (1 1/2 tsp): Use real vanilla, not the imitation stuff, because you'll taste the difference in every bite.
- Powdered sugar (1 cup, sifted): Sifting removes lumps so your red icing has a smooth, glossy finish instead of a grainy one.
- Milk (2–3 tsp): Add it slowly to reach the perfect piping consistency—too thick and it won't flow, too thin and it runs everywhere.
- Light corn syrup (1/2 tsp): This ingredient was my secret weapon once I discovered it; it gives the icing a professional shine that makes it look genuinely blood-like.
- Red gel food coloring: Gel coloring is more potent than liquid, so you use less and keep the icing from getting too watery.
Tired of Takeout? 🥡
Get 10 meals you can make faster than delivery arrives. Seriously.
One email. No spam. Unsubscribe anytime.
Instructions
- Heat your oven and prep:
- Preheat to 350°F and line your baking sheets with parchment paper so the bottoms don't brown too much. This is a good moment to gather everything—having your ingredients lined up makes the whole process feel less rushed.
- Combine your dry ingredients:
- Whisk the flour, baking powder, and salt together in a medium bowl and set it aside; this distributes the leavening evenly through the dough so you don't get any odd dense spots.
- Cream the butter and sugar:
- Beat them together for about 2 minutes until they're pale and fluffy—this is where the magic starts, because you're essentially whipping tiny air bubbles into the butter. If the mixture looks almost mousse-like, you're there.
- Add egg and vanilla:
- Mix these in until you don't see any streaks of egg white, which usually takes about a minute of beating.
- Bring the dough together:
- Add your flour mixture on low speed, mixing just until the streaks of flour disappear; overmixing at this point will make the cookies tough and chewy instead of tender.
- Shape and bake:
- Scoop tablespoon-sized portions, roll them gently into balls, and place them 2 inches apart on your prepared sheets. Flatten each one slightly with your palm—they should be about 1/4 inch thick. Bake for 10–12 minutes until just the edges turn golden; the centers will look barely set, which is exactly right.
- Cool them properly:
- Let the cookies sit on the baking sheet for 5 minutes so they firm up slightly, then transfer them to a wire rack to cool completely. This prevents them from breaking when you go to decorate.
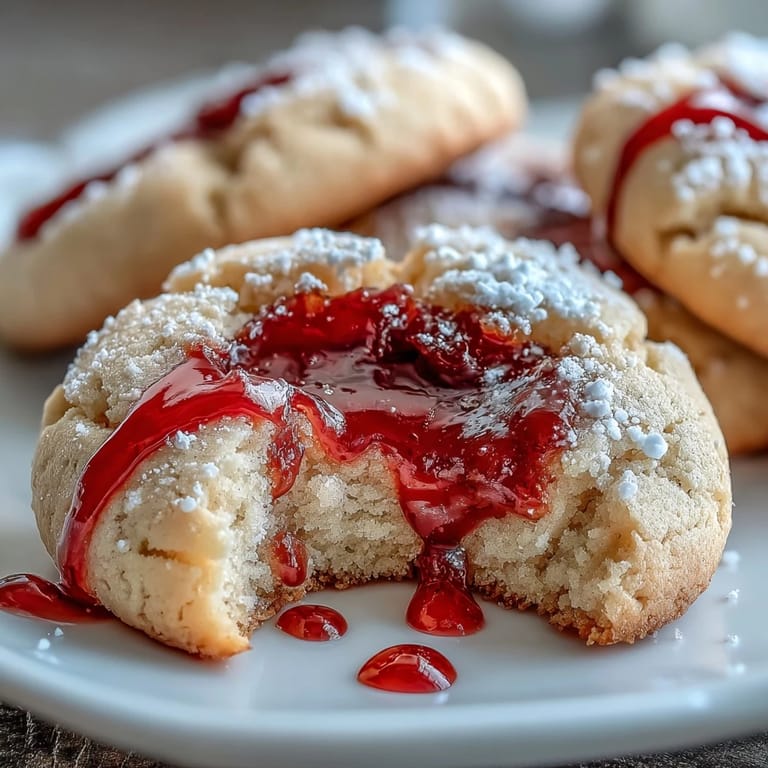
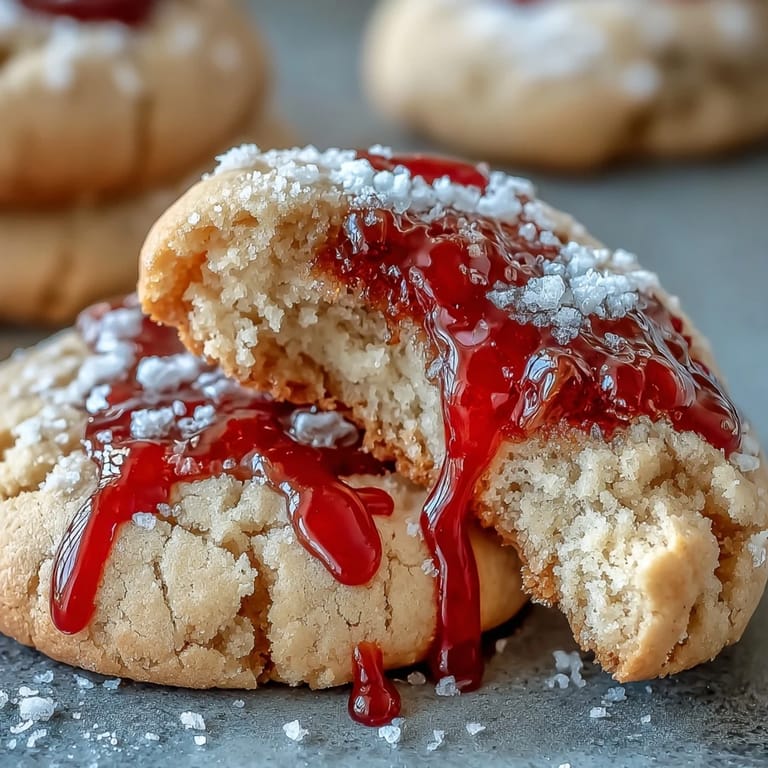
- Create the vampire bites:
- Once completely cool, use a small straw or the end of a chopstick to gently poke two small holes near the edge of each cookie, pushing just deep enough to make an impression without going all the way through the bottom. The two holes should be about 1/2 inch apart to look like fang marks.
- Make your blood icing:
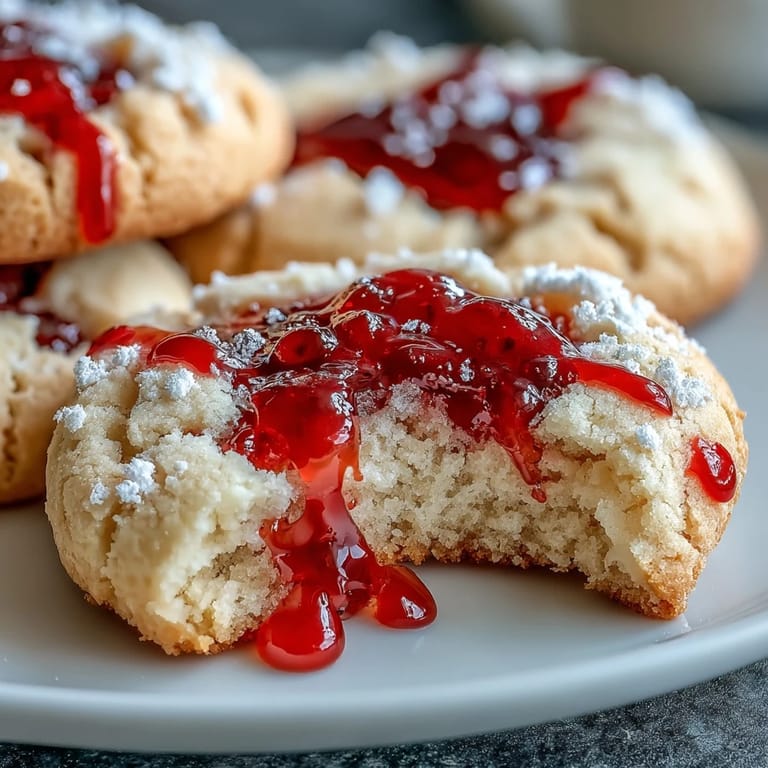
- Sift the powdered sugar to remove any lumps, then mix it with milk one teaspoon at a time until you get a thick but pipeable consistency—it should flow slowly when you tilt the bowl but not run like water. Stir in the corn syrup for that glossy shine, then add red gel coloring drop by drop until it's the color of blood you're imagining.
- Decorate with red icing:
- Fill a small piping bag or use a toothpick to carefully fill each bite mark with red icing, letting a tiny bit drip down the side of the cookie for that dramatic bloody effect. Pipe a small trail of icing from the bites if you want extra drama.
- Add finishing details:
- If you want to go full vampire, use black or dark red gel icing to add tiny details like drips or a sinister smile. Let everything set for 15 minutes before serving so the icing firms up and doesn't smudge.
 Save
Save There was this moment when my son, who usually doesn't care about Halloween, sat down and carefully decorated his own batch while telling elaborate stories about what kind of vampire had bitten each cookie. These cookies somehow gave him permission to be creative and theatrical in a way he normally wasn't, and watching him work was a reminder that the best kitchen projects are the ones that let people play.
The Science Behind the Softness
What keeps these cookies soft instead of crispy is the ratio of butter to flour and the fact that you're not overbaking them—they should look slightly underdone when they come out of the oven because they continue cooking on the hot baking sheet. I used to pull them out when they looked golden all over, but that extra minute of resting on the pan is what transforms them from okay cookies into genuinely tender ones.
Customizing Your Vampire Bites
The beauty of this recipe is that it's a blank canvas for whatever vision you have—if you want almond flavor, add 1/4 teaspoon of almond extract when you mix in the vanilla, which gives them an almost macaroon-like undertone. Some people swap in lemon extract, or even a tiny bit of peppermint, and the vampire bite concept still works because the decoration is what makes them special. The red icing is really where the personality comes through; you can make it bright cherry red, deep burgundy, or even add a touch of black food coloring to make it look sinister and aged.
Make-Ahead Magic
You can bake these cookies up to three days ahead of a party, storing them in an airtight container, and then do all the decorating the day before or even a few hours before guests arrive. This means you're not stressed on party day—you just pull them out and let people admire your handiwork, or if you're feeling generous, let them help you decorate their own. If you're using gluten-free flour, the cookies will be slightly more delicate, but they taste just as good and the vampire bite concept hides any imperfections beautifully.
- Make the dough up to two days ahead and refrigerate it, pulling it out to come to room temperature before shaping.
- Undecorated baked cookies stay fresh for three days in an airtight container at room temperature.
- Once decorated with icing, store them in a single layer so the red icing doesn't smudge or transfer between cookies.
 Save
Save These cookies have become the thing people specifically ask me to bring to Halloween gatherings, not because they're complicated but because they're fun and a little bit irreverent. There's something about serving someone a delicious cookie with dramatic vampire teeth that just makes everyone smile.
Recipe FAQs
- → How do I create the bite mark effect on the cookies?
Gently poke two small holes near the edge of each cooled cookie using a straw or chopstick to form bite marks before adding the red icing.
- → What ingredients give the icing its vibrant red color?
Red gel food coloring is mixed into powdered sugar, milk, and corn syrup to create a glossy, vivid red icing.
- → Can I make these cookies gluten-free?
Yes, substitute all-purpose flour with a gluten-free flour blend without altering the method for best results.
- → How long should the dough be chilled before baking?
Chill the dough for about 30 minutes to make it easier to handle, especially in warm kitchen conditions.
- → What are suggested pairings for serving these cookies?
These cookies pair well with warm beverages like hot chocolate or mulled wine for a cozy, festive experience.